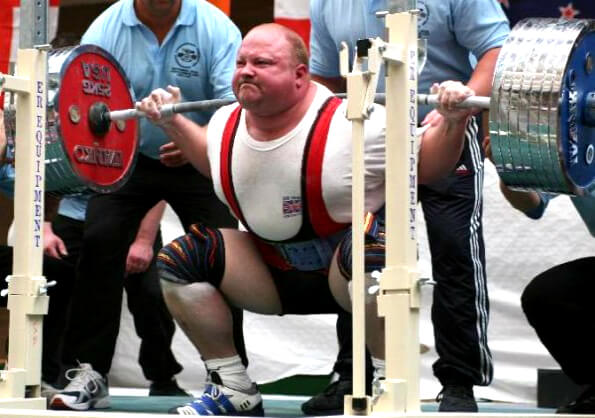
By now you’ve probably figured out that one of the main things different between elite strength training and other sports is the use of powerlifting gear and equipment. While the average weak gym-goer doesn’t have much to worry about squatting 95 pounds, when you start to add weight to the bar safety quickly becomes a concern.
But even beyond that, accelerating progress requires that you have the optimal tools to do the job. By providing you with additional support, they can help to increase the amount you lift each session. Over a long enough period of time, even a small percentage gain begins to compound dramatically. Ben Pollack is one notable world record holder who holds this viewpoint—if he doesn’t have his gym bag, he doesn’t train.
And if you plan on competing equipped, you have no choice. Without the proper items, you just aren’t competitive.
The same goes for commercial or home gyms who need nothing but the highest quality manufacturing when it comes to bars, racks, monolifts, platforms, and beyond.
With raw, equipped, and gym-owning lifters alike in mind we created an easy-to-view table that helps you jump where you need quickly.
- IPF and USAPL Approved Gear
- Shoes
- Belts
- Knee Sleeves
- Wrist Wraps
- Singlets
- Equipped Gear
- Additional Accessories and Supplies
- Powerlifting Gym Equipment
Luckily the sport is an extremely cheap one compared to others that can easily run athletes into the thousands over the course of their training career. Furthermore, most of the stuff is made to last for the long haul if you simply keep up with general maintenance.
If just starting out and you aren’t sure about your division or federation yet, there are four items you need to worry about immediately.
Once you have those, you will want to pick up some other essentials that can greatly aid your training. You should probably figure out which fed you plan to roll with as soon as possible though so you don’t need to make returns or double-tap your bank account.
Continue reading the article below, or click on an image to read more about powerlifting equipment.
IPF and USAPL Approved Gear
The International Powerlifting Federation and popular affiliates only allow the use of certain equipment at competitions.
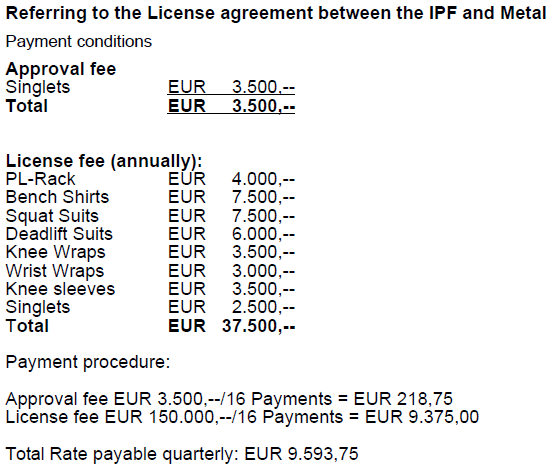
It’s kind of stupid, really, but they only want to allow their…sponsors’ stuff at events and thus disapprove anything with an alternative logo. Their policy of charging companies 5 figures a year to allow lifters to use their brand has upset a lot of people. The company METAL released a picture of the annual agreement—for a total of roughly $46,000.
The IPF approval process could be an entire article by itself.
At least their official website doesn’t hide this fact, though they use the term “Technical Committee” to mask what it is—sales team.
“Only costumes, support shirts, wraps and singlets from commercial manufacturers officially registered and approved by the Technical Committee shall be permitted for use. This applies to all championships and records, from Local to World.
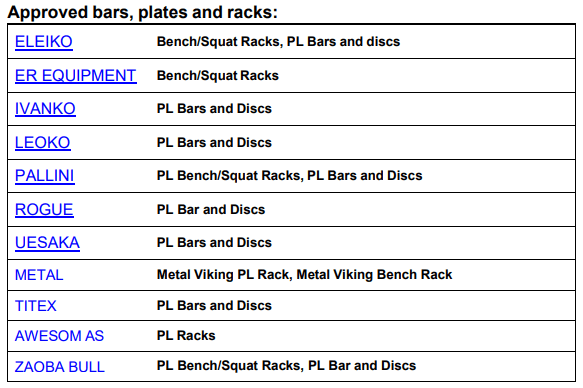
Only bars and plates, squat racks, bench racks and benches from commercial manufacturers officially registered and approved by the Technical Committee shall be permitted for use in World, Regional and Continental Championships. The setting of World Records must be made with Bars and Discs featured on this list.”
You can view the official list at any time here. But it’s not organized very well and it can be somewhat confusing, so we’ve created a list with that in mind.
All Divisions
There are a few universal items that are required no matter what IPF or USAPL division you want to compete in.
- Singlets: required—can’t be excessively padded (<= .25 inches thick) or have straps wider than 1.5 inches.
- Underwear: only briefs (whitey tighties) or nothing is allowed—you can’t wear boxer briefs, etc.
- Undershirts: required for the squat and bench press for all—males can opt not to wear an undershirt for deadlifts but females must. A7 is an amazing new brand on the scene that disrupted this area completely—their patented t-shirts are now by a majority of lifters.
Optional items include chalk, nose tork, and baby powder.
- Chalk is an absolutely essential part of any gym bag. It aids tremendously for grip on deadlifts and is also helpful while squatting or benching. Additionally, you can put it across your upper back to create a snug fit against the barbell or bench during competition. Some gyms may have a negative attitude towards it; in these cases liquid chalk is the best option.
- Smelling salts (ammonia) are an inhaled substance used in medical applications to prevent fainting by increasing the body’s need for oxygen and producing a catecholamine (adrenal) response.
- Baby powder is a household item used to cover the legs during deadlifts to decrease friction; though a small help, it could prove the deciding factor in a truly-maximal attempt. Some may also use it on their armpits as well, though you should note it isn’t allowed anywhere near the platforms or bar and you definitely don’t want to get it on your hands so have someone else help you apply it.
Raw
All of the items in this category can also be used when lifting in the equipped category.
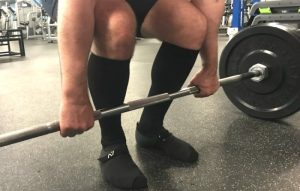
- Shoes: must be worn for all three lifts though a different type is normally used on each—heels can’t be larger than 5cm and inserts can’t be more than 1 centimeter in height (deadlift socks are also required but not on other lifts)
- Lifting Belt: they are permitted but cannot exceed 13mm (.51”) in thickness or 100mm (3.93”) in height
- Knee Sleeves: they are also permitted but can’t be longer than 30cm and cannot exceed a thickness greater than 7mm
- Wrist Wraps: permitted and can’t be longer than 1 meter or wider than 3 inches—additionally they have to be worn a precise way or your lift will be red-lighted
Equipped
- Knee Wraps: can’t be longer than 2.5 meters or wider than 3 inches
- Deadlift and Squat Suits: must be of a single thickness and between 3-15cm in length from the crotch area to the bottom of the leg
Approved Brands
On top of the various specification requirements, only a handful of manufacturers’ items are allowed for use in actual competition. This can change from year to year, but here is 2018’s list:
- Inzer
- Titan
- Metal
- SBD
- StrengthShop
- Beast Genetics
- Bukiya
- Eleiko
- Rehband
- Super Training (though their STrong line is only USAPL approved—beware)
- Wahlander
- Lifting Large
- Best Belts
- Iron Tanks
We will keep this updated, but if not here it the official page.
Lifting Racks, Barbells, and Plates
If a competitor completes a lift with a bat that isn’t approved, it doesn’t count. Only those from companies officially registered with the organization’s tech committee can be used at regional and world events. Additionally, all world record deadlifts and any other lift must be set with one of these manufacturers.
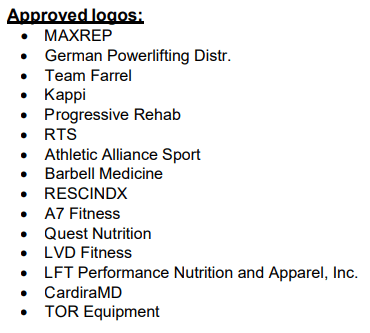
Logos
Want to represent yourself or your own team? The “Technical Committee” says Too bad. Only certain logos can be displayed. The fee is 500 Euros per year. Below is a chart for 2018.
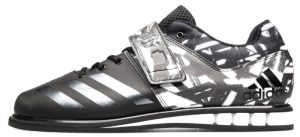
Powerlifting Shoes
Any well-though-out gym bag includes a quality pair of powerlifting shoes. Everything starts with a solid foundation, and if you don’t have the proper footwear to grip the ground and deliver force efficiently, you’re just setting yourself up for sub-par output or injury.
Over the past couple of years, they have started to become a mainstay even in general fitness circles as more people learn of their effectiveness. With so many options of both old and newer models though, it can seem like an overwhelming task.
Important Things to Consider
When considering footwear, there are two aspects lifters are concerned with: compression and stability.
Shoes that allow for a lot of compression, while good for activities such as running, are terrible for lifting weights. As you push against the ground, the compression absorbs the forces—effectively robbing you of poundage. On the flip side, if you have a hard and flat sole, there is absolutely zero compression and every single ounce of force produced by your legs can effectively transfer through your shoe and into the ground.
Stability is a must for safety reasons. Using tennis shoes or wearing your footwear too loose is a recipe for injury, guaranteed. Failing while squatting isn’t fun—failing while squatting because your angle rolled over and the tendons in your ankle snapped is a different story. As you un-rack the weight on squats, push against the ground on deadlifts, or force yourself into the bench while pressing, you need this stability to stay tight and keep tension throughout your body. When you put on a quality pair for the first time, you’ll know instantly what we’re talking about and won’t want to lift without them.
But taking a step back, we know that the sport is comprised of three lifts. Along with this comes the need for footwear optimized around each.
3 Different Styles: Which is Best for You?
For squats there are two options.
- Tall raised heel
- Short raised heel
- Flat
Taking a look at databases and record-breakers, there isn’t really a clear line between which is best. This almost undoubtedly comes back to individual differences in body structure (taking a quick look at these two hips—crazy!).
Surely stance width is correlated with the type to wear then, right?
It would make sense, but for all three types there are elite-level lifters who take short stances, and those who take wide stances.
When it comes to what works best for you, experimentation is the only factual answer. While we could easily come up with some answer not based on anything factual (like so many other strength training sites do—it’s getting pathetic), we will simply leave you with the point that most people tend to find a heel to work best for squats, and a flat option to work best for deadlifts.
Almost all options are used by both men and women, you probably won’t see a bunch of guys wearing pink and black heels.
For deadlifts, there are a very small amount of people who find the heel actually helps them lift more weight despite lengthening the range of motion slightly. But for most people, either deadlift shoes or deadlift slippers will be the best bet—and they’re flat.
Slippers are great because they slide onto your feet quickly and can easily fit over deadlift socks which are designed to protect your shins. Furthermore, they are made out of lightweight materials and have insane grip. Lastly, they provide a “naked” feel that just can’t be replicated by a shoe. Many find this last aspect to be a deal-breaker for them and thus can only use slip-ons.
On the other hand, shoes provide support and structure as well as a solid base with zero compression. Some prefer a high-top style to cover more of the ankle while some opt for chuckas.
While there is a sea of different companies and versions, there are only a handful of popular, quality brands.
- Adidas
- Reebok
- Nike
- Metal
What if you don’t have a lot of money, are cheap, or want the most cost efficient option?
Chuck Taylors for lifting during all 3 lifts is your best bet—it’s simply the most versatile and the cheapest.
The long-standing footwear has pretty much become iconic in the sport. Good luck trying to find a meet with no one wearing these.
BUT, there is one specific type we haven’t been able to find anywhere that has the great, classic bottom construction with slightly more padding in the top so it doesn’t crinkle and fold—feeling way more solid during heavy lifting
(Edit: thanks to one of our readers, we found it—Dave Draper is the man, and no not that one).
Now that you’ve got your feet covered in some awesome new strength sneakers you are ready to pick up the next essential item.
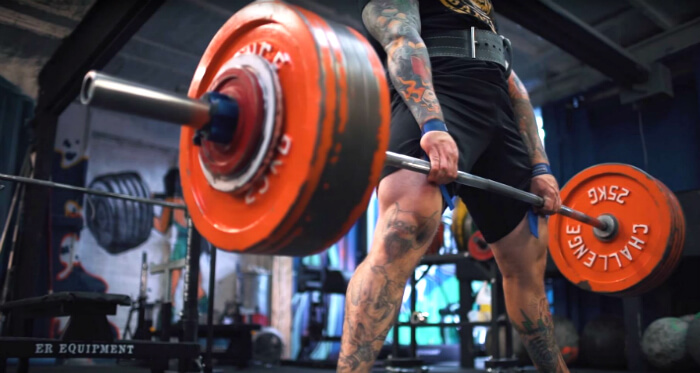
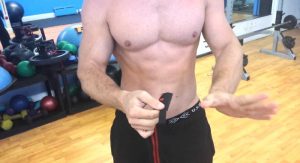
Powerlifting Belt
You can find the classic weightlifting belt in just about every serious gym bag out there. However, a belt for bodybuilding and one for strength-focused lifting are two very different things.
The former is worn extra tight to help compress the stomach, and the latter is worn looser with room to build internal abdominal pressure and constructed of thick leather and steel buckles and levers (which is actually one of the biggest mistakes beginners make—wearing it too tight).
Which enters into the next point.
If you’re going to use a powerlifting belt, know how to use it as well. Simple putting it on as tight as possible will actually make things worse.
The goal is to build intra-abdominal tension. This is done by performing the valsalva maneuver—simply put, you inhale deeply and use that big breath to push out against the belt.
Now we are starting to enter the territory where your federation will play a large part in what you get.
How to Choose?
Any that can support their own weight (pun intended) will be made of leather and not padded—so don’t even consider that cheap sports authority knock off. They’re made for the average, ignorant gym-goer and that isn’t you.
Additionally, the main difference between a general fitness or Olympic weightlifting belt vs. a powerlifting belt is the tapered construction. That allows for Olympic-style lifters to have additional mobility during highly-athletic movements such as the clean and jerk.
On the flip side that same explosiveness isn’t needed during a squat or deadlift so mobility can be traded for the strength-boosting effects of more stability with no taper.
For the bench it becomes a muddier subject as some swear by an Eleiko belt for benching and say it added an easy 15-25 pounds depending on the person. In this use it is actually worn with the belt buckle on the back so that maximal hyperextension of the lower back can be achieved—a bigger arch and better base equals more weight lifted.
When it comes to quality, thickness is the biggest area of concern and why buying a cheap option literally doesn’t work as well—it’s not just about how long it lasts though the best companies even offer lifetime warranties. Anything from Walmart or Dick’s Sporting Goods is going to be 6mm or even less. The difference between 6mm and 13mm is remarkable. Interestingly, for such large and noticeable difference in effectiveness and quality, the cost difference really isn’t much.
Some incorrectly think this is because high quality ones are made with a single piece of leather. It’s an easy mistake to make when some companies like Inzer use terms like “one solid thickness of leather.” That is untrue—a cow’s skin isn’t 13mm thick. In actuality, they have multiple layers with a slight bevel and hand-crafted burnish and stitching. Only with these high level craftsmanship techniques do you get a really compact, stiff final material.
This rigid, inflexible multi-layered piece of thick leather can push back against your core as hard as you can push out with your abdominal muscles, otherwise that goes back to the compression issue of running shoes—it’s just lost forces that you could otherwise be using to lift more. It’s simple force vector physics (imagine that, learning physics on Physiqz).
After deciding on thickness you need to figure out your style. There are four and it can be easy to get lost in the weeds so we covered the pros and cons of each.
Lastly is just the brand. And just like with everything else, there are great and bad companies and everything in between. Any on the list you can trust but make sure to check your fed’s approval list if different from the one earlier in the article.
Really quickly, your things to keep in mind:
- Thickness
- Style
- Brand
But let’s dive in further.
Picking Your Thickness: 10mm vs. 13mm Powerlifting Belt
There are two different levels of thick to pick from, and there is a world of difference between the two.
- 10mm: amazing general training belt—the idea is to use this one during your training cycle and then only switch to the heavier thirteen millimeter during competition or max out lifts. The concept isn’t new but it works incredibly well: train harder than you compete.
- 13mm: for maximal support and absolute top-level numbers you will need the added rigidity and stiffness. Just the three additional millimeters is enough to make an incredible difference.
But like anything in life, it’s a bit more complex.
For deadlifts many find that the extra 3mm actually becomes an issue, making it difficult to get into position properly with the hips close to the bar and the shoulder directly over it. Even a few millimeters can make a huge difference when you start to consider the force vectors involved in heavy weights (remember sine, cosign, and tangent equations?).
Furthermore, of all three lifts the deadlift is absolutely the most sensitive to setup and positioning—many would argue positioning and setup are everything especially for sumo.
The verdict: start with a 13mm and immediately begin thinking about trying out a 10mm at the very least to see if it is as much of a deal-breaker for you as it is for some.
5 Different Styles: Lever, Prong, Double-Prong, Wahlander or Quick-Release, and Tapered
Unlike with shoes, there are 5 options at your disposal. They all have their pros and cons, which we have distilled to make a difficult and cloudy decision easy—almost as easy as the personal best you’re sure to crush wearing it.
- Prong: this is the classic weightlifting belt style you’ve probably seen in high school weight rooms; it has a sturdy buckle and a single prong to lock everything into place.
Pros:
- Classic enduring style
- Extremely low maintenance
- No lever means nothing to break or fail—will easily last a lifetime with some good old tlc
Cons:
- Difficult to get on and off
- Not able to keep it on in between sets
The verdict: solid “base” option that you know you can always count on and an essential item if you plan on competing—you won’t have to worry about it breaking after your second squat attempt.
- Double Prong: exactly like it’s counterpart above except with the addition of another prong, it might provide more support or be essential if you’re lifting 600+ pounds or the actual belt quality is poor, but in reality it just takes more time to get on and off. For this reason, if you want this classic style you should opt for the single.
Pros:
- Everything as the option above
Cons:
- More work to get on for no real added benefit
The verdict: stick with the single.
- Lever Belt: these have been gaining in popularity and it makes sense—they provide the same support as a prong belt but they’re easier and faster to use. On the flip side they are known to sometimes break and if you lose or gain weight you’ll have to use a belt tightener to re-adjust it.
Pros:
- Very easy and quick to get on and off
- Able to wear in-between sets, making it probably the best option for general day-to-day training
Cons:
- Because of the added mechanical piece, it has the ability to break and fail—and they sometimes do, unless you get the very best
- Depending on whether you are cutting or bulking, you’ll have to get out the adjustment tool and change the effective length
The verdict: the best option for your general training sessions—makes things so much easier when you can keep your belt on after a rough deadlift set, so much so that you might want to store your prong away for competition (you’ve been warned).
- Wahlander or Quick-Release: this is an interesting combination between the above, providing the same quick-release as a lever belt but relying on prongs to tighten down as well. They are probably the rarest type, but may actually be the best as you’ll find out below.
Pros:
- Very low maintenance just like the original single-prong
- Nothing to break or fix
- Quick-release feature makes it as easy as the lever to use—wear it in between sets
Cons:
- None
The verdict: the best option but also the most pricy; if you’re looking for the absolute best this is it.
- Tapered: in the case of powerlifting this only really serves 1 purpose and that is for use on bench. All of the other options above are 3 inches in height at every part, which erodes a good amount of mobility in the lower back—good for squats and deadlifts but bad for bench press.
Pros:
- Tapered design allows for more lower back mobility and thus a bigger arch, base, and bench press
- More comfortable to wear than the others
- Perfect for front squats when utilizing the clean grip, or if incorporating cleans or snatches into your training
- Same maintenance and care-related benefits as the other prong styles
Cons:
- Not suitable for squats and deadlifts and therefore not versatile
The verdict: if your bench is slacking, this might be more mandatory than optional—but make sure to get one of the others first as you need something you can wear on all three lifts.
But that only covers the different styles. You also need to consider size and thickness.
The brands are pretty straightforward so we’ll keep it simple with a list.
- Inzer
- Eleiko
- Titan
- Rogue
- Pioneer
- Wahlander
The final best recommendation?
A fully-approved 13mm Wahlander quick-release for competition, a tapered Eleiko for bench press, and a 10mm inzer or titan lever for training as well as deadlifts.
These two combined will literally last you a lifetime and provide the benefits and versatility of a training belt with the needed support of a belt for maxing out.
If looking for the most cost efficient solution, stick with a 13mm Titan single prong. That way you can use it for both training and competition even if it does throw off your deadlift some.
Powerlifting Knee Sleeves
Powerlifting knee sleeves are supportive and generally made of neoprene with a small amount of additional construction materials. In competition, 7mm is generally the maximum thickness allowed.
Beyond just keeping your knees warm, they provide you with three distinct benefits.
- They keep synovial fluid around the joint—an egg-white-like substance that reduces friction leading to smooth-gliding joints during movement.
- They increase proprioception—a fancy way of referring to your body’s kinesthetic awareness and ability to sense where you at in space. On squats for example, you may become used to the precise sensation created as they stretch and bunch in the hole at proper depth. You can then use this to make sure you never have to worry about squatting high.
- Though debated, many find that they increase the amount of weight you can lift, which may be true depending on how tight you intend to wear them. Keep in mind that in competition you must be able to easy put them on and take them off by yourself—or at least that’s what the rulebook states. This happened after IPF Raw Worlds in 2013 when the Russian team was caught using plastic bags and multiple grown men to pull them onto their athletes.
Additionally, if you are experiencing knee pain or patellar tendonitis issues they will help tremendously and pretty much act like a cure. With that said, knee pain is indicative of improper biomechanics due to poor mobility. The limber 10 is a must whether you are experiencing pain now or wish to stay healthy—if you lift heavy and do not perform the proper and adequate amount of mobility work, you will get injured. Guaranteed.
Getting Them On
Putting sleeves on is an entire topic by itself, especially if you opt to get a tighter pair. However, by knowing a little trick you can get them on a lot easier (though they’ll still be rough until broken in just a bit).
First slide it over your foot and ankle and onto your calf. It should be at least above your ankle bone as this point.
Next, make a small fold at the bottom of the sleeve all the way around so that the underside is showing just enough for you to get your fingers underneath—then just pull up. The smoother texture of the inside will actually let you slide it up your leg. Some also like to fold the top down some but it isn’t required.
Confused? Don’t worry, this video shows you from a great angle.
Care and Maintenance
While treating your stuff nicely is a good idea if you plan on making it last, this item is unfortunately prone to developing odor and becoming unhygienic due to being wrapped around sweaty knees for extended periods of time.
Contrary to common belief, putting them in the washing machine is a terrible idea for longevity—but a great one if your goal is to fray and ruin them faster.
Instead, use a wetsuit cleaner—it is specifically designed for neoprene and does the job perfectly. This is an amazing tip that is unfortunately not well known.
Lastly, definitely don’t put them in the dryer. Ever. Only air dry them so they retain their full elasticity and original shape.
Some brands will have the strength-enhancing affect more than others due to their build, with SBDs and Mark Bell’s STrong line taking the win over Rehband and Titan.
If you aren’t aware already, sleeves are way different than wraps, which are actually made of a stiff material and wrapped aggressively around the knee during non-raw events—adding anywhere from 40-70 pounds depending on the lifter.
They are also highly recommended to wear at all times in training during your working sets. You will be hard pressed to find a single raw lifter who doesn’t use them at all times—and for good reason.
Each brand has their own unique design and stitching patter, creating for a different fit and lifting experience. For this reason, it is important to choose wisely so you don’t need to make a return.
Despite plenty of faulty claims, there are only a handful of brands used by the powerlifting community—and for good reason.
SBD
At the maximum allowed thickness and link of 7mm and 30cm respectively (longer than any others on the market), this has become the industry standard across not only the United States but the world at large. While they may do a good job of outreach, they aren’t just popular because of their marketing—they might be the best powerlifting knee sleeves in the game right now.
Out of the list of options, along with STrongs they are definitely the tightest-fitting which makes them lends to their weight-increasing benefits.
But unlike the STrongs, they are approved for every IPF competition—the former is only allowed in USAPL, which may not be an issue at all if you are competing in America and aren’t in the top 5 of your weight class at the national level.
Another notable difference between these and Mark Bell’s version is the taper—which you may or may not likely. Some find the taper really helps to pull on the sleeve and get an appropriate and snug fit. Others find the diagonal stitching required to create this tapered effect generates an odd sensation for the back of the knees that can be uncomfortable.
95%+ of people will have zero issues with them—and if that is you, definitely pick SBDs even over STrongs for the additional length without sacrificing rigidity. Best of all, they provide a very in-depth sizing chart so that you can make sure you get the perfect fit from the get-go, and even give instructions depending on whether you want the tighter competition fit or a more general training pair (pro tip: go a size smaller than even the tight fit—you’ll thank us later when you PR in the first gym session).
Rehband
This is your best option for general training. If you can afford to get more than one pair, you will prepare yourself much better for meet day by again, training harder than you compete. When you throw on your 13mm belt and your SBDs after lifting in Rehbands and a 10mm for 8 weeks, be prepared to feel significantly stronger from the added support.
On game day, you want to do everything in your power to create these competitive advantages for yourself over the other athletes present if you are serious about winning. These small adjustments really start to add up, especially when just 10-20 pounds can mean the difference between gold and not medaling.
Also, they are very comfortable—moreso than stiff SBDs that you need to hit top-end numbers.
Mark Bell’s Super Training STrong
This is your other stiff, competition-appropriate option. Mentioned above, it is accepted in the USAPL and possibly other affiliates, but not in the IPF at the current time (though Mark’s slingshot series is allowed, they aren’t recommended at all).
The great part about these is they do not have a significant taper. If you are one of the few bothered by SBDs, this is going to be your go-to.
Also on the plus side they are slightly cheaper.
Titan
If color schemes are a big deal to you, Titan is your solution. While they aren’t quite as good as Rehband, they fit into the same less-supportive category and run cheaper. This is going to be your best value and the most bang for your buck—anything less and you might as well not get them at all.
Powerlifting Wrist Wraps
Next on the list of necessities: choosing from the best powerlifting wrist wraps available.
Again, you should be checking with your fed to make sure they are allowed as a small handful don’t—but if you are in the USAPL or IPF don’t worry, they are fair game.
What are they?
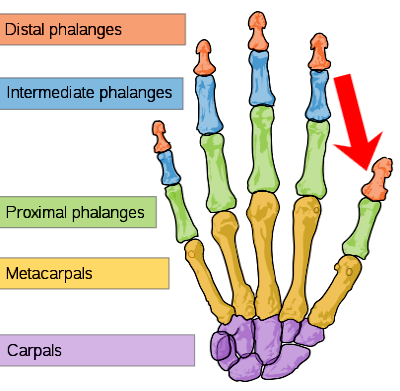
For starters, they provide structure and support to the many small bones and ligaments of the wrists. Even tweaking one of these ligaments can lead to nagging pain that you either have to train through, or stop all-together to let heal. Don’t put yourself in that situation—it is extremely demotivating to say they very least.
Though they aren’t going to add any weight to your total in a more direct way like sleeves and belts, they can allow you to get into a more advantageous biomechanical position—indirectly allowing you to lift more.
As a final note before we dive further, these are not powerlifting ‘straps’ which go around the bar to help assist your grip (sometimes referred to as deadlift wraps as well).
How to Use Wrist Wraps
Putting them on may seem like a pretty straightforward task, but there are a few pointers that will help you get them to fit better and tighter.
It is important to note that in a majority of feds, you can’t put them on any higher than 2cm above your wrist. Additionally, you can’t wear the thumb loop during your attempts (but using the right technique the loop comes in handy big time—which surprisingly we couldn’t find anywhere else online).
Ready for the trick?
Instead of placing the strap fully over your thumb and the proximal phalange, place it on the distal part (very tip) of your thumb. As you finish wrapping you will be able to easily slide your thumb out—making use of the loop to get things nice and tight without breaking any rules. Even when you’re not competing, get in a habit of doing it correctly and use this method.
Squatting
When it comes to the squat, you may be thinking: why do I need to worry about my wrists?
In a perfect world everyone would have perfect form and impeccable mobility. Unfortunately, reality is much different. In essence, wraps allow you to get into a better position that you otherwise would be able to.
They do this by manipulating the relationship between wrist extension and external shoulder rotation. If shoulder mobility is lacking—and it is for most—the wrists can help to compensate by getting into a highly extended position. The only downside with this, is that it is very painful with heavy weights because the wrists are responsible for absorbing much of the pressure.
Enter wraps: they allow you to have this excessive wrist extension without experiencing pain by providing much-needed support.
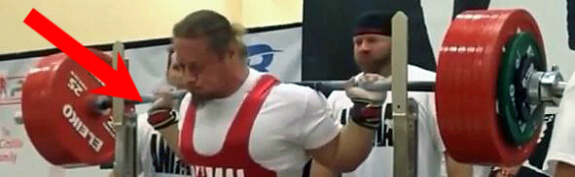
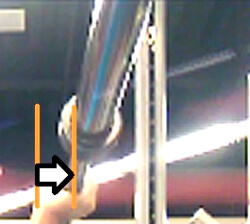
Take a look at elite lifter Dan Green. As you can see clearly, his wrists are quite extended—but this allows him to pull his shoulder blades down and back into a much tighter position. Furthermore, the bar is able to be placed further back and more over the midline of the body—making the biomechanics of the lift easier.
If used in this fashion you will want to try a more flexible wrap designed for wrist extension (SBDs are preferred with THPs as the cheaper option—brands explained below).
But this isn’t the only way to make use of them. Another method used is taking a thumbless grip in order to have completely neutral, stacked wrist joints with strong and tight shoulder positioning (like Bryce Krawczyk of Calgary Barbell always harps on).
Take a look at these two pictures.
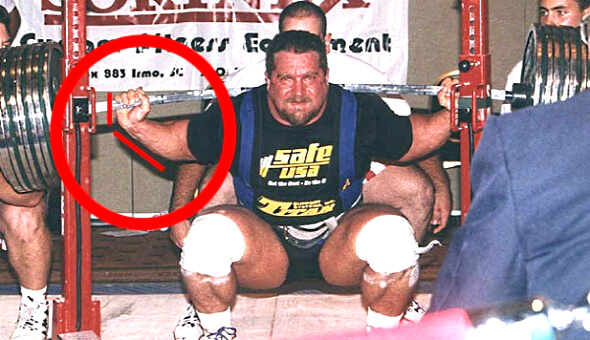
This person would greatly benefit from using wraps with the “Dan Green method.” As you can see clearly, there is a large vector force being translated directly into the joint—not good.
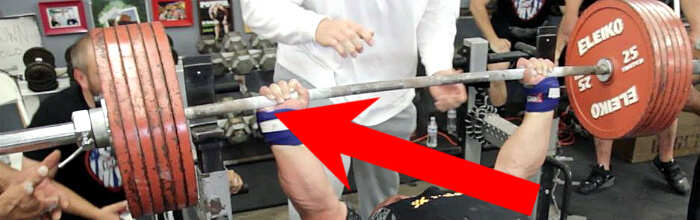
This person would greatly benefit from using them with the second, stacked-joint approach. While he is clearly extremely strong (and brave), one wrong slip of the bar on his back would be a chaotic disaster—easily avoided by just wearing wraps.
What technique you specifically use, we can’t tell you. You will have to experiment with both to find the best solution for your unique limb lengths, hip socket positioning, individual strengths, and weaknesses. With that said, most find the first option to be the best—so start your experimenting there.
Bench Pressing
Using them for bench press is more intuitive and straight-forward. It might be obvious, but this lift is where they really shine and come in handy.
As you un-rack the weight on bench press, the force is transferred from the barbell, through your wrist joints, and into your back and the bench. As you begin to get stronger, this pressure becomes significant. Even many elite lifters won’t bench press anything over 225 without them.
But there is an additional advantage. They also ensure the moment arm between your forearm and the barbell is as short as possible.
This keeps your wrists stacked and aligned by supporting the thicker part of your thumb. The bar then fits more securely for a stronger pushing base.
You can’t just slap them on and expect it to work this way though—there’s a trick. Instead of grabbing the bar with your fingers as you found on deadlift, place the bar into the meaty part of your thumb. You want to grab the bar at a slight angle. Bryce breaks this down perfectly in video form below.
Deadlifting
They provide the least benefit for deadlifts and thus aren’t used often in this case, but you will still find people at every meet who place and medal who are wearing them going into their final three attempts.
It works because if wrapped tightly enough, it can help to force your wrist into a flexed position—making it harder for the hand to open and thus drop the barbell. It may not be a huge help, but it can be enough to tip the scale in your favor if you are truly hitting a peak, max-out deadlift.
Length
They come in varying lengths so you may be wondering if 24/30 inches have any advantages over 12. In short, yes—big time.
The most you can go in 36 inches unless you are competing in a small, unknown federation. However, this can be overkill for most training sessions unless you’re an equipped heavyweight or super heavyweight lifter. But when meet day arrives, you will want the added length to absolutely maximize your powerlifting gear for the allowed regulations.
While the 24-inch option is better than 12, go with the 30 inch pair for training. It will provide the perfect balance between ultimate support and stability without having to feel like you’re wrapping your arm in a cast every time you bench press.
Any brand worthy of making it into your gym bag needs to use a stiff blend of cotton, elastics, and polyester—this isn’t your normal light-weight material made for the typical lifter for a reason. They were made to increase totals and were specifically designed to be the very best powerlifting wrist wraps.
Titan Signature Series Gold
When it comes to stiff, they rank high.
While many products break down with heavy use, this one is made to last. Manufactured in the USA, the quality is no joke—you can expect them to go on for years with an occasional wash.
Slingshot Gangsta Wraps
Mark Bell has grown in popularity since the launch of his powerlifting magazine Power and the opening of his Super Training Gym. While some of his other products aren’t approved (due to some good old IPF drama), his ‘gangsta wraps’ have quickly become one of the most popular in the USAPL.
The stiff, competition-style support has challenged the gold series which is pretty remarkable when you consider how long Titan has been around in the industry and crafting high-quality products.
They only come in 20 inches and 36 inches so you’ll want to get the longer ones.
SBD
These make it into the list for two reasons.
First, their stiff version is hands down the most popular competition wrap in the IPF and USAPL. Go to any meet or watch any live stream and you will see red and black everywhere. This is largely because they have become a huge sponsor.
But it’s also because they are longer than the gold series at the maximally-allowed length of 1 meter (39.37 inches).
Secondly, they offer another version that is specifically designed to allow more wrist extension and thus becomes perfect for a) squatting and b) general training after your main lifts.
Titan Max RPM
This is the best cost-effective option for a training wrap though some complain it almost provides too much give after being broken in. If you are a complete beginner this is a good place to start, but you will quickly want to get a stiffer version if you squat using the second technique—as well as for bench press and competitions.
The verdict: 2 pairs—stiff and flexible—of SBDs are the best option, but if price is a limiting factor then stick with the RPMs and acquire a stiff pair as soon as possible.
Powerlifting Singlets
As with the sport of wrestling, wearing a powerlifting singlet isn’t an option—it’s a requirement. They don’t offer any sort of additional support or protection and are simply designed to fit tightly so that no part of your clothing gets caught on the barbell, rack, or bench (weightlifting singlets serve the same purpose and they are largely interchangeable).
The only real thing to keep in mind is that, just with any other item, only certain brands are allowed in the biggest federations.
When considering what to wear underneath, be aware that only briefs are allowed—you can also wear nothing.
We have now covered all of the essential items that everyone needs, no matter what. Next up we have some additional items to accelerate your training to the next level, but first let’s talk about equipped lifting.
Equipped Powerlifting Gear
While no one can argue the popularity of raw lifting is on the rise, many contend equipped lifting is the core of the sport and the hardest. They aren’t wrong—anyone who has done both can attest to the countless additional variables that need to be accounted for and perfectly optimized.
These divisions involve the use of additional items that aid in the lifting of more weight:
- Knee Wraps
- Deadlift and Squat Suits
- Squat Briefs
- Bench Shirts
If competing in raw classic, only knee wraps are needed.
If competing in a fully-equipped division, however, an entire ‘outfit’ is needed—additional squat briefs worn under the suit are optional.
These extremely-supporting suits and shirts fight against the bar on the weight down—helping to force it back up as you hit the hole on squat or reach your chest on bench.
There are two categories depending on the amount of layers used in construction:
- Single-Ply
- Multi-Ply
Some federations may allow for an unlimited amount of ply layers, however. Again, you will want to check.
Additional Accessories and Supplies
The first two are fully allowed in competition and are used almost universally at meets as well as during training.
- Chalk
- Ammonia—also referred to as smelling salts and nose tork
Chalk helps to dry residual moisture on your hands—increasing friction allowing you to get a better iron-tight grip on the bar.
It makes a huge difference on deadlifts, but is also extremely useful on squats and bench press as well where it can be applied not only to the hands but to the back for better contact with the bar and bench respectively.
For the sake of training, some gyms do not allow it. In these cases liquid chalk is a great alternative—but get the regular stuff if you can as it works better.
Smelling salts help you to get amped up for maximal lifts by spiking your adrenaline. It is an intense mind-clearing sensation that can easily mean the difference between a good lift and a failed rep. However, it should be used sparingly for two reasons.
- If you use a stimulant excessively it begins to lose the same effectiveness that it once had
- Mental fatigue is a real thing to be aware of in your training—getting amped up with nose tork on every lift will make it harder to recover
With that in mind, it is an extremely beneficial training aid when used in moderation. Key word: moderation. As far as ammonia inhalant side effects and safety concerns, you don’t have anything to worry about—it is used in medical applications for fainting. Anecdotally, many lifters use it multiple times a training session and there are no reported issues.
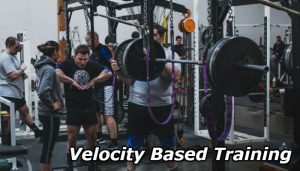
There is also an emerging style of training known as velocity based training where devices are used to offer unparalleled auto-regulation support. Things can get out of hand really quickly so we’ve put together the 7,000+ word whopper linked above to break everything down for you.
Finally, microplates are absolutely critical to progressing effectively on upper-body movements and honestly, aren’t optional–you should have them already.
Elbow Sleeves
Elbow sleeves fit around the elbow in the same way that knee sleeves conform to the knee, providing increased warmth, proprioception, and synovial fluid buildup—all great things.
They aren’t allowed in competition, but many people find them to be essential at keeping your elbows healthy and free of injury during training. A quick search on YouTube of the top lifters and you’re bound to see them using them.
Some may prefer elbow bands or straps for lifting which acts as a wrap instead, allowing you to control the tension. Wrapped tightly enough, these can add a lot of weight—any numbers you hit won’t be considered raw. But again, you can’t use them in competition so it doesn’t really matter anyways.
Either is a great investment when looking to outfit your gym bag.
Straps (Deadlift Wraps)
While the above item is more optional, straps are used by almost if not all top strength athletes during training—but in the correct context.
You need to have a strong grip. If you don’t, you will fail in competition time and time again. Knowing this, you need to perform as much of your heavy work as possible with just chalk.
But there is a limit to what the hands can take. When you start pulling 315, 405, 495, and 585 for reps—stuff starts to rip from the sheer amount of friction and pressure driving straight into the hand.
Straps are the perfect solution for this problem.
Lifters can use chalk until their grip begins to wear out or their hands begin to develop blisters. Then straps are thrown on to complete the remainder of the workout—just because your grip gives out doesn’t mean your legs or back are fully stimulated. You wanted maximum results, right? This is how you do it—a common trick of the trade.
Powerlifting Equipment for Gyms
Up until now, everything discussed has fallen into the category of wearable items used to either enhance maximal strength output or augment training.
But in the world of elite-level strength, gear goes beyond just what you can wear. The proper gym setup relies on a handful of truly quality items for both longevity and effectiveness.
- Barbells: Deadlift Bar (Texas, etc.), Squat Bar, Safety Squat Bar, Transformer Bar
- Calibrated Plates
- Platforms
- Racks: Combo Racks and dedicated Squat Racks
- Monolift with Safety Straps
- Weight Sled or Prowler
- Chains and Bands
- Bar Jack
- Chalk Stand
With just these items, you can truly create a dream gym—and if you’re outfitting a larger space, this will make sure the athletes who have the privilege of using it have the absolute best range of training options and modalities for optimal, consistent progress.
Beyond those essential supplies you may want a custom gym banner to add more life and character to the area.
More Articles
Velocity Based Training: Open Barbell vs. GymAware vs. FORM and More (Research)
Inzer Belt: Ultimate Guide (Lever vs. Forever, Sizing, Reviews, & More)
Powerlifting Singlets: Sizes, Reviews, Tips and More (Men & Women)
Best Deadlift Shoes for Optimal Technique and a Bigger, Stronger Lift
Adidas Powerlifting Shoes: 2 Options But Which Is Best?
Powerlifting Wrist Wraps: How to Lift More with the Best Wraps Available
3 Reasons Powerlifting Knee Sleeves Should Already Be In Your Gym Bag