Technology is ever advancing, and in the realm of strength and fitness this is especially true as velocity based training (VBT) is now becoming widespread throughout crossfit, olympic lifting, and powerlifting gyms.
But it doesn’t stop there—major sports teams have joined in, with strength coaches from top universities relying on VBT devices to make powerful and intelligent training adjustments from session to session.
What exactly is it?
While the device comes in many forms as you will see below, the premise is the same regardless: it measures the speed of your lifts through a barbell accelerometer to provide real-time, actionable training data.
But how does that help?
Simple: auto-regulation.
How Velocity Based Training Works
Gone and past are the days of simple percentage training. While it is effective for beginners who can expect consistent gains found through simple linear periodization, it isn’t optimal for intermediate and advanced lifters. For this reason, RPE-based training has now become a staple in strength training circles of all types.
Standing for “rate of perceived exertion,” it is a method of optimizing each workout session to get the absolute most out of your time spent in the gym. Everyone has great days, and everyone has bad days—RPE training was made specifically for this. When you aren’t adding weight each week as a novice, being able to track your real “work output” is essential to maximizing recovery and therefore gains.
While mentally gauging each set’s difficulty can put you in the general ballpark most of the time, in many cases it can be way off.
Excel spreadsheets are great, but they don’t capture the complex, constantly-adapting physiology of human anatomy and fail to provide real-time feedback. Instead, they provide a static number and hope for the best.
Have you ever gone into the gym, felt like trash, and still had an amazing workout? Everyone has.
Barbell speed trackers allow you to account for this: they provide an instant, measurable metric that can be used to determine how much should actually be lifted. If you feel fatigued and sluggish but are actually moving the barbell at a good speed, this information becomes invaluable. Instead of dropping weight or calling it early, you can go up in weight. Compounding from session to session, this small percentage gain can make a huge difference in the course of a training cycle.
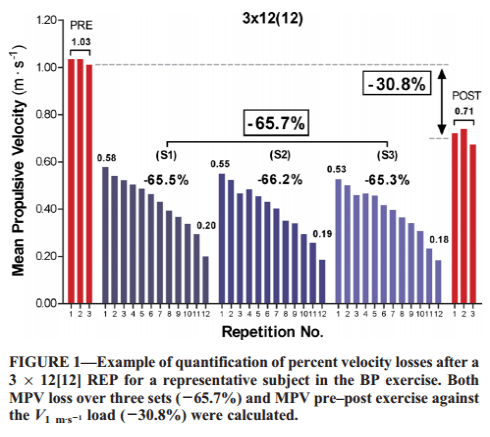
Taking a look at scientific evidence, we can turn to a study published in the journal of Medicine & Science in Sports & Exercise. At the conclusion of the study, the researchers concluded with strong confidence that there is a high correlation between a loss in velocity and metabolic fatigue, supporting the validity of using a speed measurement device in training.
Furthermore, another study published in the Journal of Australian Strength and Conditioning shows how truly variable strength is from workout to workout. Researchers found that estimating a daily 1RM provided for a range of variance of 18%. That means if you have 75% of your 1RM max programmed for your workout, the actual load you should be using could be anywhere between 75% +/- 18% (57% to 93% of your 1RM). We see firsthand how stark the difference is.
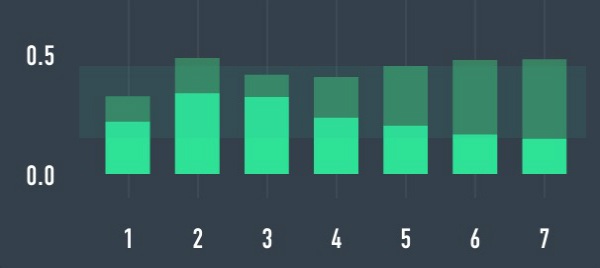
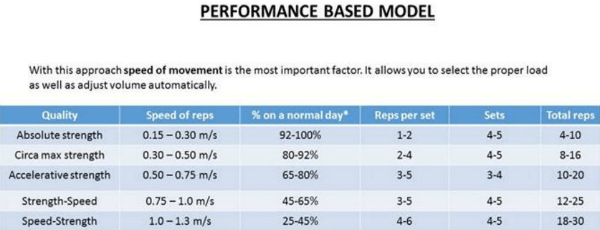
Understanding this, VBT then allows for a velocity to be given instead of a hard number through using the zone chart above: each workout is hyper-optimized for as much progress as the central nervous system will allow that day.
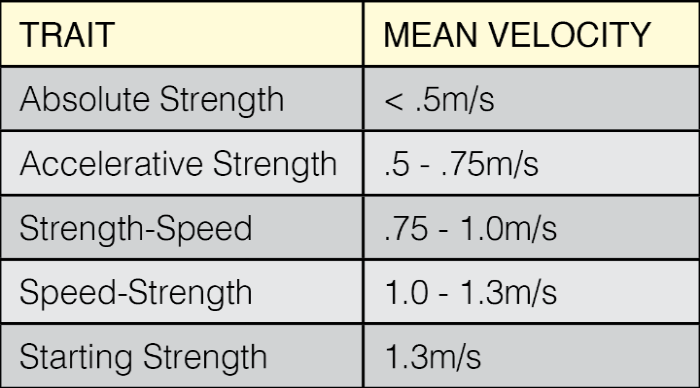
To make this conversion from percentage to bar speed, the velocity zones chart serves as a reference:
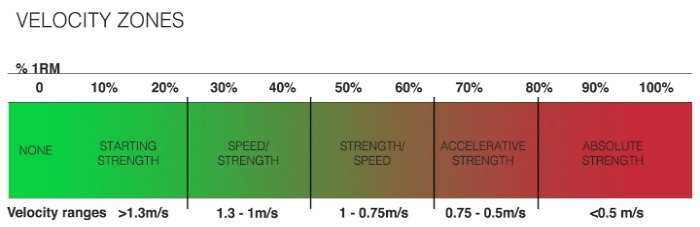
- Absolute strength: the ability to produce a maximal force against a heavy load and most responsible towards increasing 1RM in a given lift. A true 1RM that falls under the absolute strength category will be roughly .3 meters/second for squats and .15 meters/second for bench press.
- Accelerative strength: the ability to drive and produce force against a heavy load (pushing off the line in football or a rugby scrum. Velocities for this category fall between .5 and .75 meters/second.
- Strength-speed: the ability to move a moderate load at a high speed (“moderate load” being roughly 50-60% of your 1RM—traditional volume training). Velocities fall between .75 and 1 meters/second.
- Speed-strength: the ability to move lighter loads at a very high velocity. Here, speed falls between 1 and 1.3 meters/second.
- Starting strength: the ability to produce maximal velocity from a dead stop—very high speeds with very low weight. Speed in this category falls between 1.3 and 1.6 meters/second.
By using these velocities to choose the correct load, a much more accurate weight for any given session can be chosen. This is because, as explained above, 1RM from day to day is highly variable—whereas the relationship between velocity and percentage of your 1RM (by the zones chart above) remains stable at all times.
But going even further, being aware of these zones allows athletes to focus on specificity—a fundamental, key tenant of training. This is why, for example, powerlifters stick to 80%+ of their 1RM for the bulk of training—they are developing absolute strength.
Alternatively, a football player would find much more benefit training within the accelerate strength zone of 70-80%–allowing him to get off the line and overpower his weaker opponents who mistakenly trained too heavy in the weight room and failed to capture the same accelerative benefits.
With that said, how the device is actually utilized will vary slightly depending on if you are a powerlifter and focused on top-end strength or an Olympic lifter concerned first and foremost with power.
VBT for Powerlifting and Strength Movements
Certain barbell movements are radically different that others when it comes to speeds at different segments of a given lift. In the case of “slow” exercises like the squat, bench press, and deadlift (SBD) mean velocity is best utilized (olympic lifts are very different and require a focus on peak velocity—explained below).
There are two steps to prescribe the correct weight using for non-power movements:
- Provide a mean velocity to determine the weight used (highly linked to intensity)
- Provide a maximum allowed velocity loss (range) that determines when the set is terminated; on some units this is entered under “quality threshold” (the real way to measure fatigue instead of guessing based on how you feel, which is more often than not a lie)
The precise allowed drop in speed will depend on a given athlete’s goals (strength vs. endurance):
- Strength-focused athletes such as powerlifters should allow for a moderate loss (30-35%)
- Endurance-focused athletes (Crossfit) should allow for a large loss (40-50%)
Furthermore, as a general rule of thumb, .4m/s is a good starting point for the slowest acceptable velocity to know when to terminate a set for general strength and conditioning. This is based on the chart of velocity zones above.
But that fails to paint the complete picture. As a powerlifter you must, intuitively, lift heavy to elicit maximal strength. It is not simply supported by anecdotal evidence, however. Studies consistently point to training intensities of 80-100% of 1RM as the most effective for developing maximal strength.
When it comes to VBT, this means you want to conduct a majority of your training at speeds slower than .5 meters/second—excluding planned high-speed days explained below. It will also depend on which lift is being performed.
Translated into real-world numbers you can use, these speeds provide a starting point to adjust from as you find necessary for your given limb lengths and form (which will affect bar displacement):
- Less than .6 m/s for squats
- Less than .5 m/s for bench press
- Less than .4 m/s for conventional deadlifts
- Less than .3 m/s for sumo deadlifts
When determining what exact weight to use on any given day, you should set a given range. An effective way to do this is to add and subtract 5% of your estimated percentage weight.
For example, if you plan to hit 315 for your working sets the range would be 315 +/- 5%, or 300-330. Once you reach 300 you would begin tracking and use the precise bar velocity to determine the exact weight to be used.
In the realms of improving form, the devices are currently useful for judging squat depth and deadlift efficiency. Measuring for the distance of bar travel, you can ensure proper depth is achieved on each squat. Additionally, deadlift bar travel should be as small as possible; monitoring for abnormally long distances can provide a clue that form is deteriorating.
Furthermore, with some practice and data collection, you can determine the optimal horizontal to vertical bar displacement on the bench press to where a simple straight line is actually not desired (surprisingly, it’s true).
By accurately tracking how the bar is moving in space, you can get insanely-helpful insight into your form that goes a lot further than asking your partner “did that squat look deep enough?”
Lastly, it should be made clear that some lifts absolutely thrive when a maximum velocity is set. In a study published in the European Journal of Sports Science researchers paired two groups of lifters:
- Group lifting at maximal velocity
- Group lifting at half-maximal velocity
The actual repetitions and sets performed by both groups were kept the same as a necessary control for all participants.
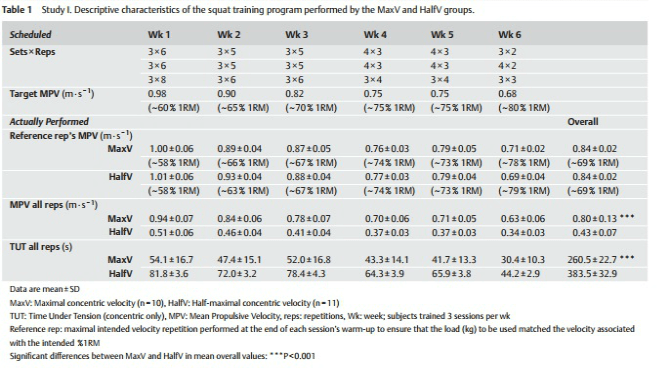
VBT program used during experiment.
While both groups improved in strength which should be self-explanatory, the group focused on maximal velocity made significantly greater gains in their bench press one-rep max (1RM). The results of the study show much promise for high-speed training, but a direct causal relationship should not be drawn as the half-speed group performed them purposefully slow. More research needs to be done in this area.
Taking a look at Westside Barbell’s now-legendary powerlifting program, we see this in action first hand: dynamic effort days focused on maximal speed is largely what separates it from anything else out there. Many disciples of Westside swear by these high-speed days, and their records very much back that up.
VBT for Olympic Lifters
In the world of Olympic weightlifting, RFD rules all. Standing for “rate of force development,” it refers to one’s ability to produce power within the shortest time possible. In the world of Olympic lifting where maximal power output is the goal, this is a critical metric that you should be measuring if you aren’t already.
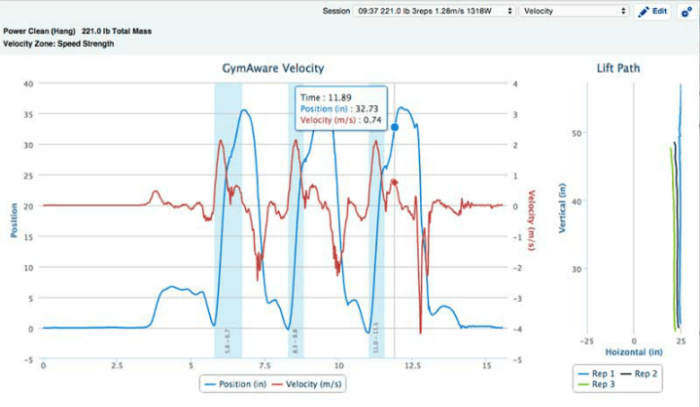
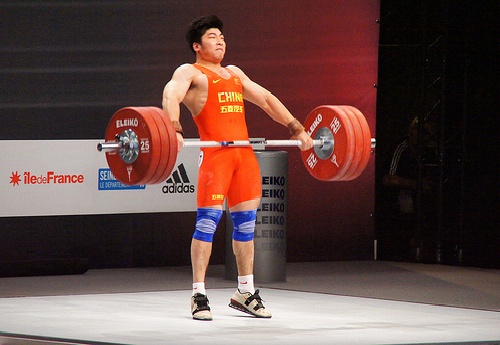
But unlike the powerlifting movements above, when determining which loads to use for Olympic lifts peak velocity must be used (and not mean velocity). While the squat, bench press, and deadlift have generally the same bar speed throughout the lift, power cleans and snatches are much different.
The explosive extension of the hips in the clean causes the bar to move faster than the initial pull from the floor—and that peak power is what determines how much weight you can lift.
To be clear, peak velocity refers to the absolute fastest part of the concentric portion of a lift. Mean velocity, on the other hand, is an average of the entire concentric portion.
From a study published in the Journal of Sports Science and Medicine, we know that the point of highest velocity in the clean and snatch happens at the end of the second pull.
The second pull.
The researchers found that athletes decelerated after this point. Having a way to measure peak speed and knowing precisely where it occurs creates the ample training opportunity to use it as a valuable loading metric.
The good news is that because Olympic lifts are performed at higher speeds, they do not fall prey to many of the low-velocity issues that come into play with powerlifting movements.
Coaching with VBT
When used intelligently and creatively with the advice above in mind, the device can play the role of a partial coach for advanced lifters—and at least necessitate the use of one less; as of 2018 it is truly leveling the playing field as lifters without the resources for a full-time strength coach can now have access to the same in-depth, actionable insight.
And in the case of beginner lifters, coaches find it to be a valuable educational tool. Unless they have previous weight room experience, novices are not familiar with RPE and don’t truly know what a “hard” set is. Recovery, muscular failure, and “leaving one in the tank” are all fundamental concepts of strength training. One coach in particular, Drew Cooper of Freelap, has found the tool allows him to send beginner lifters home with a workout that would otherwise require strict supervision.
If you are a coach working with multiple clients, it also provides the opportunity to truly set yourself apart and get your lifters hooked on the positives of VBT to keep them coming back for more.
Finally, a study published in the journal of Human Movement Science found that athletes who are given real-time, direct feedback are much more likely to produce higher outputs from workout to workout. The age-old adage holds true: that which is measured improves. Be sure to make this point known to your clients when speaking of the benefits.
VBT for Physical Therapy
Its uses aren’t delegated only to performance; it functions as a rehabilitation application by monitoring limb and muscular asymmetries. Noted extensively in research, muscular asymmetries are responsible for a majority of training injuries.
Addressing these before they compound into an injury is a fundamental tenant of prehabilitation and keeping athletes healthy. Furthermore, in the case of athletes with a significant injury to their lower body, each limb can be assessed independently to better prescribe necessary exercises to regain balance. Seeing this in practice, the difference can be stark.
Unilateral (one-sided) exercises are performed and then each side is placed for comparison.
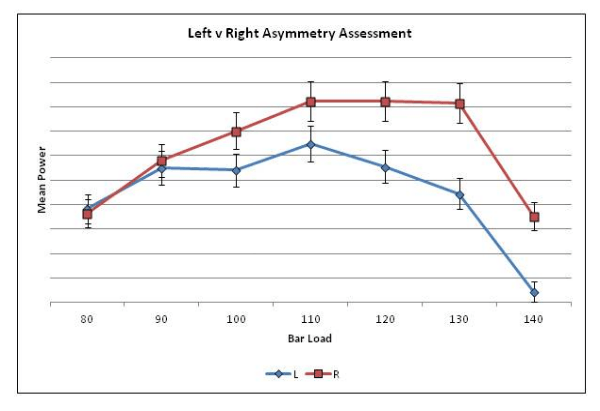
This athlete displays a remarkable difference in power and strength output when the left and right limbs are compared.
In the graph above, the athlete produces wildly different power from each leg (the error bars are 5% showing the magnitude of the imbalance). In practice, a PT would find where the load where the graph begins to separate, about 90kg in the example above, and then work from that “base of balance” for the main lifts. Additional accessory exercises would then also be given to even the imbalance.
Its usefulness in athletes with orthopedic problems doesn’t stop there, however. In the case of high-level competitors, when injuries happen they tend to stick around as there is little to no time to “back off” as every training session is pushed to the max.
Injuries to areas such as the wrist, shoulder, and elbow are common from overuse and can greatly impede proper form on Olympic lifts (which are almost always included in sports-centric weight room training)—specifically during the catching phase of the lifts. Many athletes may have a speedy first and second pull only to receive a low velocity rating because their rack was delayed. In this case there is a high peak velocity but relatively low mean velocity.
Knowing this, you can have the athlete only perform the initial part of the olmypic lifts and instead have them do power shrugs for example. The possibilities are truly endless and only limited by your creativity as a therapist and coach.
Velocity Based Training Devices (Bar Speed Tracker)
Before diving into reviews on specific gadgets, it is important to compare how they stack up in actually doing what they claim: tracking data effectively precisely (as you will find out below, accuracy is less important).
When it comes to picking the right velocity tracker, there are a host of options. At the very top of the hill are academic-level linear position transducers such as the Tendo unit, used to complete research of scientific rigor. However, that is a device that costs thousands and isn’t applicable to 99.9% of people reading this. With that said, the consumer-level options are more than adequate as you will see shortly.
If you’re wondering, the difference in price is largely due to the software component and accuracy of statistical feedback required in scientific reports which is overkill for the average lifter. In the realm of affordability, however, many gadgets provide the same instant feedback without the enormous software-induced price tag.
All of them are not created equal though. Some provide features others don’t; outside of price your choice will largely depend on your style of training and necessary uses. Most are aimed at general strength and conditioning applications for athletes involved in power and contact sports; only a handful are designed towards the goal of maximum strength and hypertrophy in powerlifting movements.
They collect data differently depending on the actual mechanism(s) inside:
- barbell accelerometer
- barometer
- gyroscope
- tethered cord accounting for angle of lift
- tethered cord not accounting for angle of lift
The use of these different systems or combinations of several make up the precise device differences.
Lastly, it should be stated that while apps such as BarSense and IronPath are innovative, they simply don’t work. Attempting to run any training cycle at intensities above 85% will result in wildly inaccurate data—even if the apps worked like they were advertised they would be great. Hopefully in the future this will change, as it is remarkable to think that no application in the Google or Apple store is able to use a phone’s internal sensors to track velocity.
The effectiveness of each device can be tested by using established, accurate physics video-analysis software as a control. Kinovea and Tracker are both well-respected free applications. For lots of data collection to perform the test, however, Tracker was more appropriate.
Before jumping into the graphs, we must address the difference between accuracy and precision.
- Accuracy refers to how “close” the gadget got to the “real” value or speed of a lift. Using a science example, if you measure a weight of 5kg for a substance but the known weight is 15kg, you have low accuracy.
- Precision refers to the grouping or closeness of more than one measurement. In the example above, if you performed the measurement 10 times and still received the same answer of 5kg every time, you have high precision.
As you can see, the two are completely independent of one another.
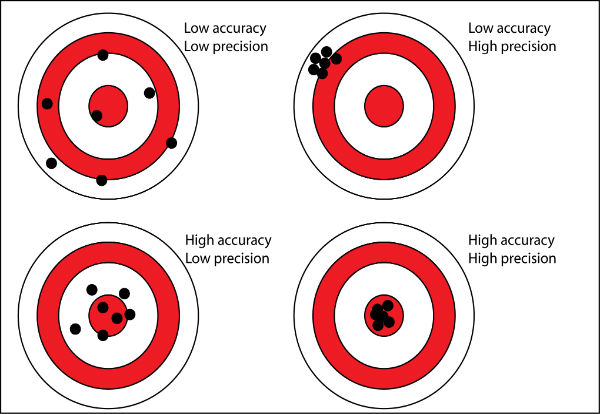
In an ideal world, devices would be both accurate and precise. In a perfect world you would have both. In the application of VBT, only a Tendo or GymAware unit will provide academic-level accuracy. Luckily, precision is much more important. As long as your measurements are reliable, you can utilize them to consistently determine the correct loading.
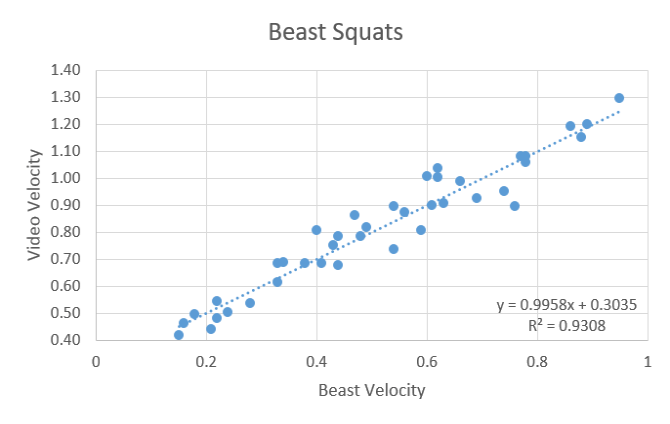
At the onset, a general scatter plot would seem appropriate enough to provide insight into how strongly correlated the devices were compared to the video analysis programs—a higher correlation suggesting a more accurate device.
Unfortunately using this graphing method becomes very noisy very fast as more variables are added. In order to combat this, a Bland-Altman plot serves us better. First let’s take a look at squats.

If graphs scare you, don’t worry—it’s a lot simpler than it may first appear. The horizontal axis shows the speed of any given lift, with the fastest on the left. The vertical axis shows how close a given device got to mimicking the data from the video analysis software, with the middle of graph being no difference (0 meters/second).
The different colors refer to the three different consumer-grade options being tested: yellow for BEAST (B), blue for PUSH (P), and red for OpenBarbell (OB). The different shapes refer to different styles of the exercise which, as you can see, produce very different results. We can make several observations:
- OB forms a generally straight line
- P also forms somewhat of a straight line, but has more variation towards the end of the set—the most important part for developing strength and encouraging hypertrophy
- B behaves very similar to P
- Front squats (FS) are not recorded as accurately as back squats or paused squats; both P and B failed to count of the FS repetitions—“ghost repetitions” that we will mention in just a moment
(For any physics-inclined people or power-nerds like ourselves, the R-squared values for B, P, and OB were .93, .84, and .92 respectively. If you’re wondering, the R-squared values refer to how close the recorded data got to the fitted regression line, a measurement that evaluates how effective one variable is at predicting another. In this case, we want to know how effectively we can predict what a given device will record based on the actual “real” barbell speed. A value of .1 suggests 100% predictability while values close to .0 convey the opposite.)
You can also see that accuracy increases as the velocity of any given lift decreases: the slower you grind out a lift, the more accurate the reading will be. Knowing that velocity equals displacement divided by time, this is because the same distance traveled is divided by a larger amount of time allowing for a lower margin of statistical error.
Regardless, as explained in the section above a velocity range should be prescribed for each workout to account for this small variance; sticking to a specific speed dogmatically puts you back into a rigid program that misses the point of auto-regulation entirely. As a general rule of thumb, most templates allow for a variance of +/- 5%.
This does not provide a complete picture, however. Ultimately, what we truly care about is “ghost reps:” repetitions the device does not record. It is the kryptonite of VBT and should be your number one concern when judging between options. Often this means less reps being counted than you actually performed, but the opposite also occurs with lots of extra reps being added that you never did. To combat this, B allows you to cut out reps that appear to be obviously wrong (though this can sometimes lead to removing reps you actually did). Alternatively, P allows you to enter the amount of reps performed and uses its algorithmic software to remove any nefarious reps.
In the defense of both of these options, this data has aged slightly and the development teams of both have continued to improve upon these issues.
Moving onto the Bench Press we can see that OB continues to remain precise and generally accurate.
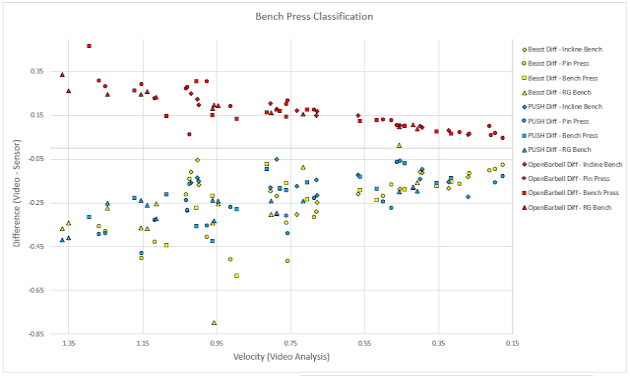
B does a good job with pin presses and P has an odd scatter which could also be due to data compression when creating and distilling the graphs into a digestible form. Even though B did perform better at slower speeds, its scatter introduces too much variance to truly rely on the data.
P missed 4 repetitions and B was guilty of dropping 3. Again, OB came out on top. This was also reflected in the R-squared value this time at a value of .98.
Before moving to deadlifts, it should be made clear that bench press is the most difficult lift to judge. Studies suggest that a true 1RM bench press hovers around the .15m/s range. Knowing that a majority of training needs to be done north of 80%, this presents some issues as the gadgets are less effective at slower speeds. Individual factors will also skew things:
- Grip width and its relationship to total bar displacement
- Limb length and positioning
- Efficiency of bar path
Put more bluntly, if you are very short with an extreme arch you will have a hard time using VBT on bench press effectively.
While bench can make things difficult due to its slow speed near maximal effort, deadlifts fall victim to ghost reps much more.
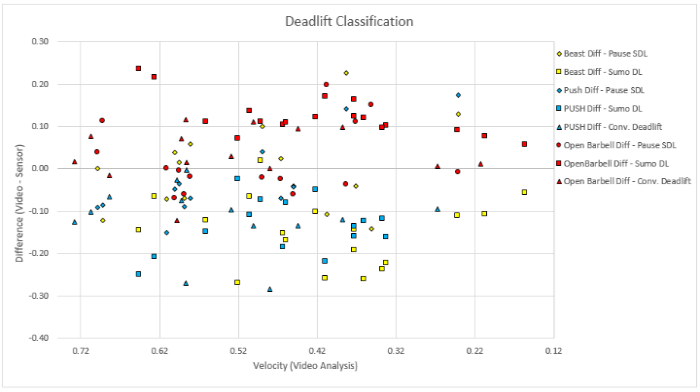
From this graph we see:
- P Dropped 7 repetitions out of 48 (14.5%)
- B appears to miss many less repetitions (35 total performed), but this is likely because of the additional reps being added on from the bar jarring as it reestablishes contact with the ground
- Again, OB appears to have less variance—especially at lower velocities where it matters most
Note that the total number of repetitions performed while testing the devices (n) were very low and thus makes it difficult to draw very strong conclusions from the data. With that said, the sheer amount of missed reps does encourage the assumption that the graph would look at least relatively similar at a higher n.
Very importantly as well, it should be known that this data was recorded exclusively during sumo deadlifts by a 5’5” lifter. Sumo is naturally slower and has a smaller range of motion as well, presenting issues of its own. If you are a taller lifter or perform only conventional-style deadlifts, many of the issues with ghost reps can be eliminated.
To get a more complete picture of this, view the individual scatter plots:
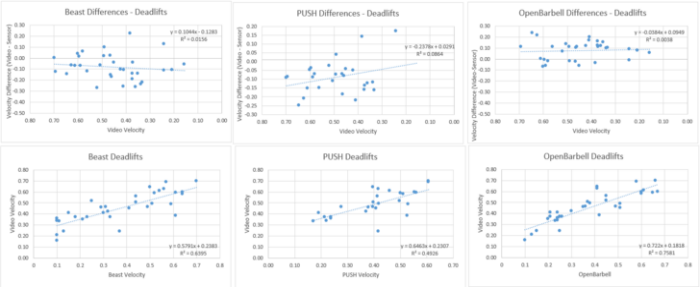
Deadlifts likely provide so much difficulty for the consumer-level options due to the uncommon nature of deadlift speeds throughout a given set. On bench press and many other lifts, the second repetition is the fastest with a steady and reliable decline from there.
Deadlifts, on the other hand, generally have a slow first rep and each following rep varies wildly in speed.
So where does that leave us?
All of the gadgets tested are accelerometers and do not include a tethered cord. They were not specially designed for athletes hyper-focused on strength. If you are a coach or elite athlete requiring unwavering accuracy and precision, the Tendo or GymAware are your options.
Honestly, though, as with any new training modality it should be implemented gradually. For this reason it is more beneficial to begin with an accelerometer and assess how well it functions for your desired purpose. Shelling out a lot of money only to find that a tethered unit creates an unforeseen barrier to your training style is not how you want to be introduced to VBT.
OB did remarkably well given the testing environment and how data was collected. If you are looking for a consumer-grade option, sticking with the OB may seem like the best approach. It is also built on open-source software and has been updated concurrently which is encouraging that it will only continue to improve.
However, they are currently sold out and the release date for the next version has not been announced. Furthermore, the presumably better-funded companies that produce B and P could easily look at the open-sourced improvements and use them to make their own devices better.
It may seem like additional focus has been given to VBT and their use for strength-centric sports such as powerlifting. This is true for two reasons. First, we are powerlifters plain and simple. But secondly, as you can see at this point measuring slower movements accurately and reliably is much more difficult. Many will never put a device through this level of scrutiny like us and we understand this.
Now we will take a look at each option individually, including those not included in the rigorous data collection up first. For the final recommendation feel free to skip to the bottom of the article.
GymAware PowerTool
Price: $2,200.
Summarized verdict: Best option for coaches, teams, and therapists (or if price is no object); its additional software features may only be trumped by how it handles ghost reps perfectly—out of thousands of repetitions performed and counted by elite track and field coach Carl Valle, not a single lift was miscounted.
Whenever you add a new piece of technology into the mix, one of the biggest concerns is being slowed down. While VBT is great, if it becomes an obstacle to an efficient workout it loses much of its point. GymAware recognizes this and addresses it head on.
The device has several key uses:
- Power and Strength Analysis for optimized lifting performance (the core of VBT described in detail above)
- Jump Testing for athletics
- Leaderboards to encourage a hyper-competitive lifting environment
In this category, GymAware is champion. Setting up the system, measuring data, and analyzing it in real-time is effortless.
- Select the exercise
- Enter the load
- Choose which metric you want tracked depending on your training
- Collect data
- Record form video (optional)
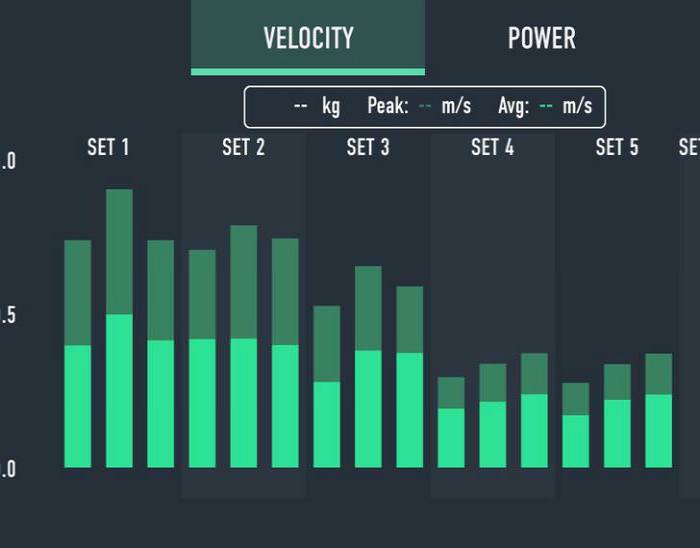
What about multiple trainees per workout? The previous form of the app was really only useful when used for one person at a time given the interface. However, the recently updated version now provides all info on one screen which functionality to switch between athletes quickly and efficiently. With the new and improved version, it takes roughly 10 seconds per set—allowing more than enough time to keep the workout moving.
And for clients, the interface is highly engaging and intuitive. Instead of a simple number display, it shows speed at every part of the lift and elicits a “ding” when the velocity requirement is met. On the flip side, a “dud” sound occurs if the lift fails to meet the required speed. This sound is obviously critical as athletes can’t re-rack the bar and look at the data mid-set.
If you plan to use it across multiple athletes, the cloud storage version of the app provides the ability to sync all of your data across several devices. Furthermore, everything can be accessed online. If you are lifting by yourself, however, this isn’t necessary.
In more detail, here are the three available app modes:
- Free Run Mode: most basic version providing all necessary real-time data while also collecting and saving it for later analysis—most useful for a single trainee
- GymAware Lite: all of the functionality of the free run mode with the ability to monitor multiple athletes at once; additional ability to collect data across several lifts and export to CSV
- GymAware Cloud: all of the features of the above, except the ability to monitor large teams of athletes with data from all devices automatically synced to the cloud; you can also setup “squads” and set more appropriate training partners
Its direct competitor is the Tendo Unit, but surprisingly it may come out on top.
More specifically, the Tendo has a bad habit of allowing the tether cord to accidently “over-wind.” This is a big problem when trying to track data.
To address this, the PowerTool has an innovative spooling mechanism that adjusts as more tether cord is released. This makes sure there is no bunching.
Lastly, this device is the only one that provides the tether angle. While other gadgets are forced to calculate horizontal based on angular rotation (presumably), this one accounts for the angle physically and then automatically calculates the correct vertical component.
FORM
Note: it is currently sold out as they develop a new and improved version.
Price: $249.
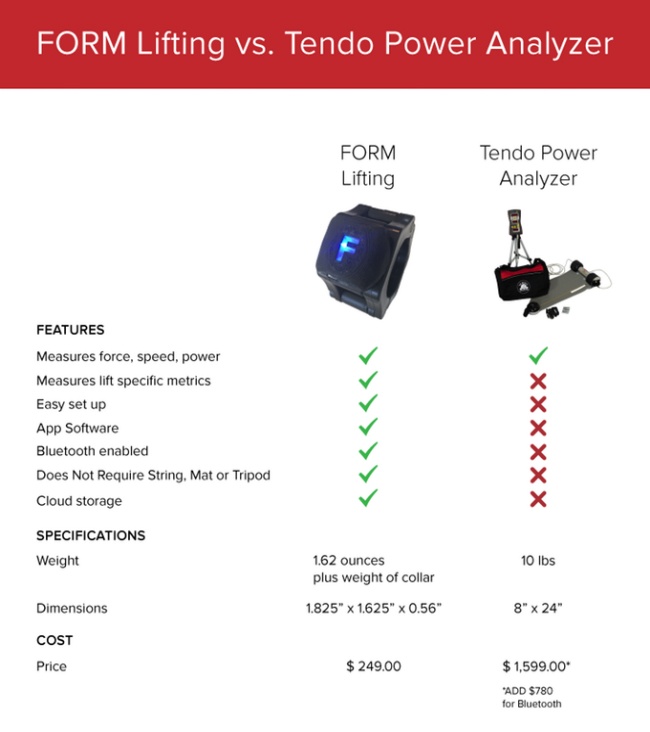
Summarized verdict: solid choice for general strength training and weightlifting athletes. However, it is not recommended over OpenBarbell or Beast for the same price (though OB is currently out of stock).
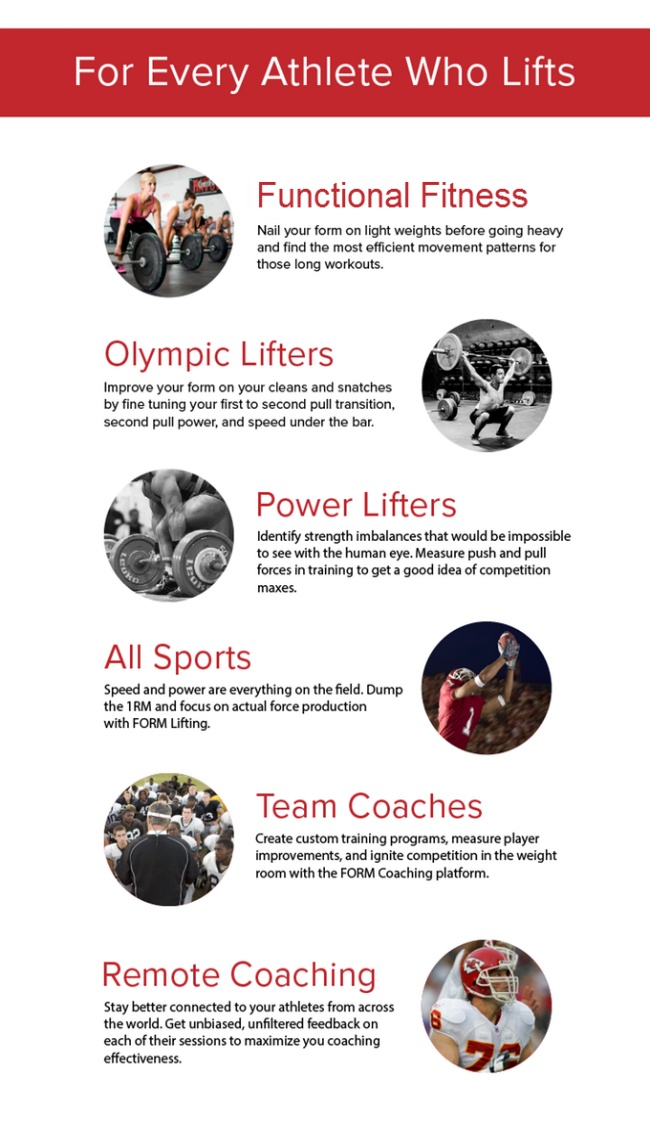
A completely different design than above, the FORM lifting collar attaches to the end of a barbell and takes the place of one of a normal collar. Developed by Scott Mahr, it is most suited towards those involved in CrossFit or general weightlifting. While it is actually just a lockjaw collar with the sensor screwed on the back end, the gravy is in the app itself.
On their Kick Starter page they advocate its use for a variety of training applications.
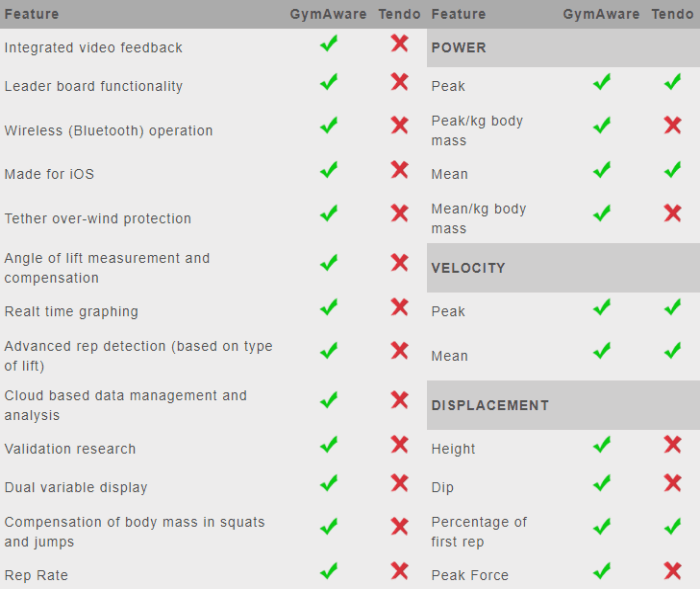
They also took the step of providing a match-up in comparison to the Tendo unit.
Currently, it supports 7 exercises:
- Power cleans
- Snatches
- Push presses and Jerks
- Thrusters
- Bench Press
- Deadlifts
- Squats
One of the main selling-points of the device is how few steps are required from the moment you set your gym bag down to the second you un-rack your first set.
- Turn your phone’s Bluetooth on
- Open the app and select the lift being performed
- Enter the weight used under the lifter name (so power can be tracked)
- Place the collar on the barbell and perform your repetitions
When it is connected via Bluetooth and operating properly, it will display an illuminated light.
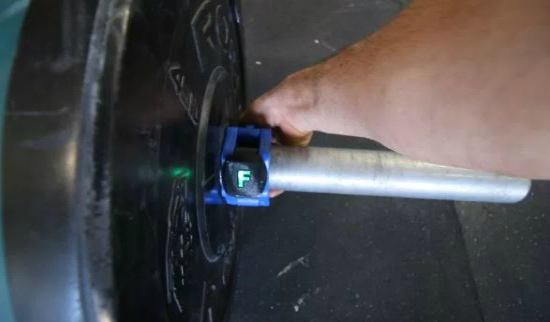
You’re ready to lift.
Bar Sensei
Price: $249.
Summarized verdict: best suited for sports and general weight training applications as well as for individuals focused on development of power movements (cleans, snatches, jerks, etc).
The BarSensei is different from the above options in that it attaches to the barbell with a sleeve. One of the fundamental tenants of the device is the utilization of low-energy Bluetooth to preserve battery life. This also has the added benefit of encouraging only relevant bar movements to be tracked.
Currently, it supports 10 different exercises:
- Bench Press
- Pin Press
- Deadlift
- Snatch
- Hang Clean
- Power Clean
- Squat
- Box Squat
- Jump Squat
- Pin Squat
(Any new ones added during future updates will be provided at no additional cost the user.)
Given its sleeve-like design, it is also much more convenient when changing weights as it can be wrapped directly around the bar instead of being placed on the end like a collar.
The interface and provided data is quite extensive and is mostly tailored towards power athletes: those who perform cleans, snatches, and jerks during a majority of their training. This is seen with one intuitive feature called “POP-100” which involves RFD in a very hands-on and practical way.
For this reason and those of convenience and practicality mentioned above, the device is best suited for sports teams and athletes performing olympic-style lifts.
Beast
Price: $249 for individuals and $399 for trainers.
Summarized Verdict: Best “value” option given the 5-mode approach for all styles of training. Considerably less expensive than the PUSH band but slightly less accurate and reliable (during testing).
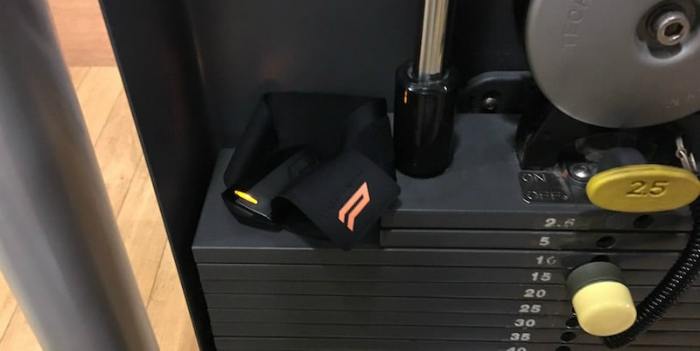
The Beast Sensor is unique in that it can be worn on the hand or attached to the barbell directly via magnet. This isn’t just convenient—it also opens up the opportunity for other applications, such as placing it on a machine weight stack.
In practice, it seems to work best when attached directly to the weight or barbell in this fashion. For Olympic lifts or other barbell exercises with phases of high velocity, the strap should be used regardless so that the sensor doesn’t shift around.
There is also the additional option of a wearable vest, but it costs extra and its applications are limited largely to jump training and testing.
Giving it a solid edge in the software and presentation department, it provides easy-to-use modes that are based around the velocity zones talked about in-depth above:
- Velocity
- Power
- Max Strength
- Hypertrophy
- General Performance (no specific goal-oriented tracking intended for general data collection)
Simply select your desired goal for any given training session, select the exercise, and you’re ready to lift.
Also giving it an edge, it provides support for all exercises with a fully-customizable interface. This alone helps to make it the clear choice for anyone who utilizes a variety of exercises (bodybuilders or general fitness enthusiasts).
The development team also did their best to spell out how ghost reps are handled, as that is the biggest concern for strength athletes. They base the validity of each repetition on three factors:
- Vertical speed
- Vertical acceleration
- Range or displacement of movement
If there is vertical acceleration but no speed and little movement, it will likely be miscounted. This would be seen in a very, very slow lift. Hitching or sudden stops in a lift will also affect acceleration calculations and can lead to additional reps being counted.
Simply put, if your form is solid and consistent and you train at speeds higher than .15 m/s you should have no issues. The only time this speed restriction becomes a large issue is on the bench press, as explained in detail above.
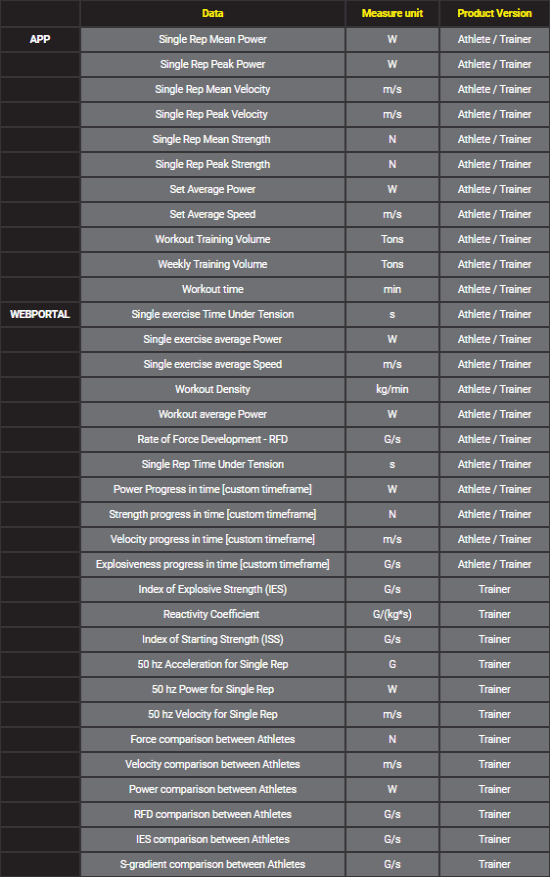
For trainers or those with clients, the additional “Trainer” package is available for purchase and provides an increased amount of data and the ability to train and manage multiple lifters through the same dashboard. If you’re wondering what additional data is tracked, their team provides an extensive table:
Lastly, it comes with a very tempting 1-year warranty in the USA (and 2-year warranty for those in Europe), excluding outright abuse or exposure to water. As long as you don’t crush it or drop it in the toilet you should be fine. If you’re just getting into VBT, this provides an additional safety net on the chance that you find it doesn’t suit your training.
PUSH
Price: $349 for the device; the optional online portal subscription charges a monthly fee of $8 for individuals, $58 for coaches, and $135 for teams.
Summarized Verdict: Best option for sporting athletes and teams given the added free movement system. Slight edge in reliability and accuracy over the Beast.
Designed by a sports technology company, the PUSH Band has found adoption with several major sports teams. The San Francisco 49ers, OKC Thunder, Texas Rangers, and the University of Michigan name just a handful of groups that now rely on VBT in their training.

The hype, surprisingly, has a solid amount of scientific backing. A study performed at Tennessee State University confirmed the device’s validity towards responsibly measuring velocity during exercise.
Visiting the PUSH website, it is clear their product is targeted mainly at teams and groups of players where their online portal and “vital” options are aimed at creating a hyper-effective environment for coaches and trainers working with athletes.
It used to be priced under $200 which would have put it in the running for best value. But at its current price point it doesn’t receive the same compliment.
It is lightweight and can be placed not only on the arm, but on other areas of the body as well if you are testing exercises that necessitate wearing it on the torso or lower body. It can also be wrapped around a barbell or placed on equipment.
Place it on equipment–the only limit is set by your own creativity.
Once the device is turned on and attached where it needs to be, users are open to a whole range of more than 250 exercises. The full list can be seen here.
After selecting the exercise, users must enter the weight to be used. If the wrong load is selected, it can be adjusted afterwards—nothing to worry about.
While the mobile app accompanies the band, the online version and portal requires an additional monthly fee. This functionality appeals to coaches and teams where large amounts of data need to be constantly monitored for trends that can suggest actionable changes to training. It may also appeal to the individual who is conducting a scientific or similar report requiring consistent and valid data; in a majority of cases, however, the free mobile apps provide more than enough functionality to get everything you need out of VBT.
Another neat feature is the integrated 1RM testing. On any given day you can perform a load for five sets of three repetitions and receive your “real” suggested one-rep-max based on the velocity of the lower weight used for the 5×3 workout. For those who are uncomfortable with making adjustments or calculations themselves, this can come in handy.
Honestly though, this is something you should be able to do by looking at the velocity zones chart and making the necessary load changes. If you’re going to get into VBT why not learn it all the way?
Lastly, they offer a unique feature called “Free Movement” that monitors any athletic movement—such as the pitching of a baseball—in real-time using video analysis coupled with data collected from the band. This can then be viewed to find weak areas throughout the movement that can be hyper-focused on. Imagine being able to monitor each tennis serve and understanding how it matches with your best—you don’t have to imagine because it’s now possible.
Open Barbell (OpenBarbell V3)
Note: the OpenBarbell v2 was the old, now deprecated version.
Price: $249; currently out of stock and interested buyers must join the waiting list.
Summarized verdict: best option for powerlifting and strength-focused athletes if it was reliably in stock.
Coming out on top in all of the tests broken down earlier in the article, the OpenBarbell (OB) device was developed by the Squats and Science team which is focused on developing technology to enhance and augment weight room training.
When it comes to the other options, OB reigns champ when it comes to accurately measuring the lower velocities associated with heavy pressing movements; according to their website currently, it can effectively track speed differences as small as 0.01 m/s. It also best accounted for the odd behavior of deadlifts during testing.
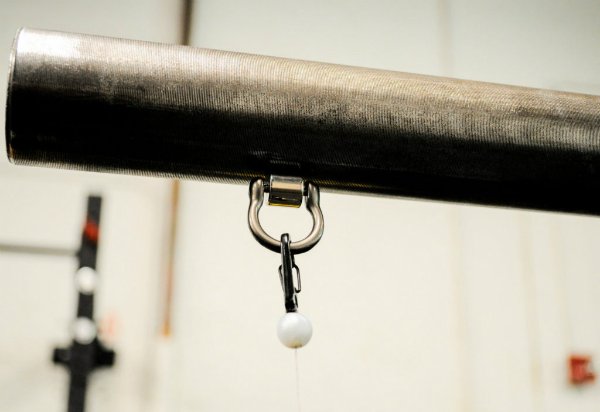
Unlike a band, the OB looks like a small canister with a magnetic base that can easily snap onto an ER or squat rack. The tethered cord uses a magnetic roller clip as well. This is an added form of convenience that also addresses the over-winding issue associated with cords that wrap around the bar with a strap.
Because it is open-source, anyone is able to suggest changes to the device firmware. This helps to encourage a much more collaborative environment for the developers of the products where they can draw from research and suggestions from universities and other institutions or individuals interested in contributing code improvements. As a consumer this can be great because it suggests and encourages a much larger pool of future updates and improvements than most apps receive.
Unfortunately, it is currently out of stock without word of when it might return.
What is the Best Velocity Tracking Device?
We have covered a lot of information. Not to worry, though. Our final recommendations are shown on the chart below to help present the best option depending on your precise needs.
| Tendo Unit | GymAware PowerTool | FORM | Bar Sensei | Beast | Push | OpenBarbell | |
|---|---|---|---|---|---|---|---|
| Price | Unlisted | $2,200 | $249 | $495 | $249 | $349 | $249 |
| Measurement Methodology | Tethered cord measuring displacement without accounting for the angle of pull | Tethered cord measuring displacement while accounting for the angle of pull | Accelerometer with accompanying barometer that attaches as a lifting collar | Accelerometer that can be worn or attached to a barbell or other equipment | Accelerometer that can be worn or attached to a barbell or other equipment | Accelerometer with accompanying gyroscope that can be worn or attached to a barbell or other equipment | Tethered cord measuring displacement without accounting for the angle of pull |
| Online Portal | No | Yes | Yes | No | Yes | Yes | No |
| Distinct Features | Scientific-grade linear position transducer appropriate for athletic compounds and research facilities | Leaderboards for teams; Sounds to signal a pass or fail for each repetition; Three app modes catering to individuals, trainers, and teams; Innovative spooling design to address cord “over-wind”; Accounts for the tether cord’s angle of pull to calculate appropriate horizontal and vertical velocity components | Lifting collar design; Easy to use; Tailored towards Functional Fitness and CrossFit | Sleeve design wraps around barbell; Unique “POP-100” RFD measurement tailored towards olympic lifts | Sleeve design that can be worn or attached to a barbell or other equipment; Optional vest for use during sport-specific training, such as jump testing; Easy 5-mode application to cater to all styles of training; Fully-customizable interface with the ability to add exercises; Trainer package allowing for cloud synching of multiple clients; 1-year warranty for USA consumers and 2-year warranty for European buyers | Sleeve design that can be worn or attached to a barbell or additional equipment; Online portal for additional monthly fee; Used by several high-level sports teams; Marketed for teams and coaches who need to train large groups and capture actionable data; 1RM mode within application; Free Movement system tailored towards the analysis of sports-specific movement such as a golf drive, tennis swing, or baseball pitch | Reigning champion of precision based on currently-available test data; Open-source software to encourage a collaborative development community; Tethered cord with unique roller hook design to prevent “over-wind” |
| Style of Training Suited For | All | All | Functional Fitness, CrossFit | Functional Fitness, CrossFit, Olympic Lifting | Functional Fitness, CrossFit, Olympic Lifting, Bodybuilding, Powerlifting | Functional Fitness, CrossFit, Sporting Athletes | Powerlifting and Strength Athletes, Olympic Lifting |
| Verdict | Best option but only suitable for large organizations. | Best consumer-level option but only appropriate for physical therapists, coaches, and trainers due to the price point. Highest level of accuracy and precision. | Not recommended over OpenBarbell or Beast for the same price. | Best option for individuals focused on development of power movements (cleans, snatches, jerks) | Best value option given the 5-mode approach for all styles of training. Considerably less expensive than the PUSH band but slightly less accurate and reliable. | Best option for sporting athletes and teams given the added free movement system. Slight edge in reliability and acurracy over the Beast. | Best option for individuals focused on powerlifting or maximal strength development. Currently out of stock. |
About the Author