Even if you’re not a competitive powerlifter or athlete, you can learn a lot towards improving your strength by understanding and following a powerlifting bench press pyramid program designed to maximize your strength in an extremely short amount of time.
Pyramid Program
Get the Physiqz Bench Press Pyramid Program with included calculators delivered to your email immediately! Note that it is still highly recommended to read this article in full to understand how the program functions and how to properly use it to maximize your progress.
And outside of the core lifting community, the flat barbell bench press reigns supreme when it comes to measuring power and strength. If you’ve been in the gym more than a handful of times there’s a great chance somebody has already asked “how much you bench?”
While a majority of programs are designed for all three lifts (squat and deadlift too), there are very few that cover the bench specifically. And the ones that do are, frankly, quite lazy in their approach.
What makes a good bench plan?
Five things:
- Intelligent periodization from week to week
Revolutionized by Romania’s olympic champion Tudor Bompa, in simplest terms, periodization is the act of increasing the weight used each session in a controlled and planned manner. It forms the core of any true training program.
While it is considered obvious now, at the time the thought of altering weights in a strategic manner had never been formulated. Tudor made his discovery by watching Russians train. They used differing loads throughout the year instead of a constant high-intensity approach to make gains much faster while staying injury free.
- Initial high frequency with low volume for bench
While the lower body responds tremendously well to higher volume, lower frequency training, the bench does not. It requires a high level of frequency, but a low amount of volume in any given session.
Why?
Consider a traditional 5-day bodybuilding split that focuses on hitting each muscle group once. On chest day, how strong are you really on that 20th set of a chest exercise?
Compare that with a plan that has only 3-5 sets of bench per session, but more sessions per week. You are getting the same amount of total volume (very important), but each workout is of much higher quality because you are completely fresh and therefore lift more weight for your repetitions.
Let’s break it down using an example:
Bodybuilding chest day (once per week) = 25 sets per day focused on chest/bench
Pyramid bench program (5 times per week) = 5 sets per day focused on bench
In both there is a total of 25 repetitions for the week. But choosing the second option, with each session you were able to lift much more on average. More weight moved for the same amount of reps equals more progress.
Why just initially use high frequency then?
The plan is designed so that high levels of fatigue accumulate in the beginning week—as the weeks progress the frequency is dropped to begin peaking for top-level strength with higher levels of intensity.
The upper body can handle large amounts of frequency much easier than the lower body where lifts such as the squat and deadlift are extremely taxing on your entire nervous system. They also require a great deal more of psychological focus and intensity (compare how you feel after squatting hard vs. benching hard).
Lastly, high intensity for each workout is critical to invoke Henneman’s size principal. The principal states that, under a load, your muscles will be recruited from smallest to largest. Therefore, in order to recruit these larger motor units, you must lift near your one-rep max.
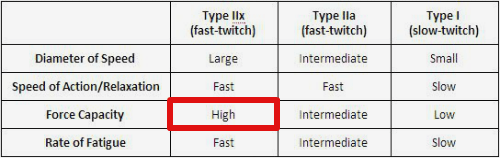
You have to lift heavy to elicit a response in your fast-twitch muscle fibers.
- High volume accessory work that is constantly rotated out
Because repetition schemes are varied, it can be easy to look at the weight you used on the previous week and get discouraged—but that misses the point entirely for accessory exercises. They are intended to provide direct carryover to the bench; if you want to get ungodly strong at pull-ups or rows this is the wrong article.
The best way to avoid this is to alternate the exercises used so that you can place your effort where it matters: using the accessory as a tool to improve your bench—nothing more and nothing less.
Furthermore, this conjugate style of alternating exercises is well known throughout the strength community for its ability to stop plateaus in their track. If you are constantly alternating exercises, you will always be progressing.
Lastly, the number one reason for overuse injuries is getting greedy. For example, say you have been really focused on dumbbell pull-overs and have done them every session but reach a point where you aren’t increasing weight easily. Why are you trying to milk out an extra 5 pounds on pull-overs, when you could easily switch to rows and get better muscular stimulation (because your body is so used to pull-overs)?
Easy answer if you’re looking to get strong: you don’t.
- Pyramid and reverse pyramid training focused on top-end RPE and low-end percentages
While using bench press strength charts with percentages is easy and evokes memories of high school weight rooms and sloppy form, it isn’t optimal anymore. We’ve come a long way in training strength since the 60s.
Instead, a new technique has emerged: RPE training.
This technique is so powerful because it works through autoregulation. In essence, this simply means altering the exact amount of weight you lift each session based on how you feel on any given day. The premise is simple: on days you feel good, it allows you to go harder and milk that extra progress.
There is an adjustment that needs to be made, however.
While RPE is phenomenal for pushing yourself, it can be an easy way to rationalize taking an easier workout day because you don’t feel “in the zone” enough.
The solution?
Use the percentages to keep you honest on days that you feel like death, and use RPE metrics on the good days to accelerate your gains. If you feel like you can do more on a given day, and you are looking to absolutely maximize your bench, you need to. RPE allows you to do this.
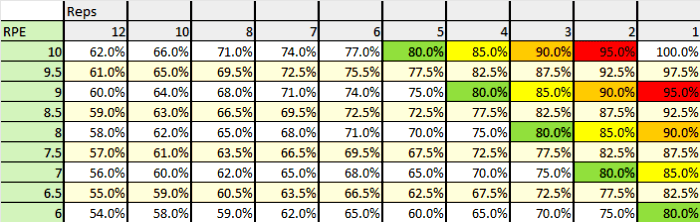
The pyramid approach is simply the easiest way to put these two concepts together. Use this chart to make conversions from percentages to RPE as needed (on your “bad” days use percentages and on your “good” days use RPE):
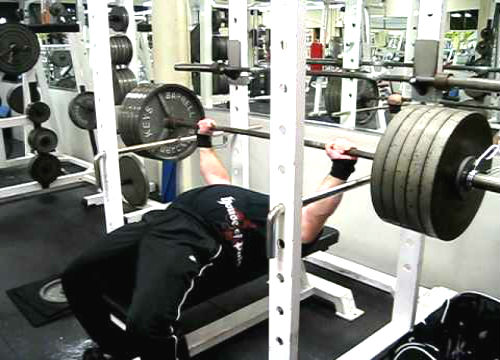
- Overloading using a slingshot
The last piece is probably the most critical, so it was saved for last.
In any true strength program, overloading isn’t an option—it’s a necessity.
While we have discussed the neurological adaptations necessary for maximal strength in detail in the past and it gets very complicated very fast, all you need to know is that neuromuscular adaptations are the crux of actually getting strong. By using heavier weights, you can train your neural pathways to fire more efficiently, more synchronously, and more powerfully.
The slingshot is an absolute killer for this.
It allows you to use much, much heavier weight than you are used to. This allows you to expose your muscles to much greater loads than they would otherwise be capable of lifting.
Is it cheating?
It depends on what you consider cheating. If the question was, “will using a slingshot allow me to lift heavier weight on average in training so that I can capitalize on that to lift much more without it?”—the answer would be a loud yes.
Just like with anything else, it is a tool that can dramatically enhance your results when used properly.
Now that you have a firm understanding of everything that went into the program, it’s time to cover form.
Proper Bench Press Powerlifting Form
If you’re used to the typical bodybuilding-style bench, you’re doing it very wrong. When it comes to truly maximizing strength on the bench, there are 3 ways:
- Gain Weight
- Get Stronger/Build Muscle
- Improve Technique
The first point will only come into play if you’re bulking, and the second is handled by the actual program.
The third is where you can really make some “free” gains.
Correct form comes down to one word: tightness.
If you can get yourself into a tight, tucked position each time, you create a strong base to push from—more weight lifted from improved leverages and stability. Furthermore, this tucked position will shorten the distance the bar has to travel.
Before we continue, something needs to be said about the “myth” that arching your back when lifting is bad.
Point blank, it’s nonsense. In reality, arching your back puts the shoulders into a safer position by retracting the scapula and removing pressure from the rotor cuffs.
Positioning
Your starting position is everything. If you are loose when you un-rack the bar, you are unable to transfer kinetic energy because you don’t have a solid base. But furthermore, you’re losing out on tension in the back, glutes, and legs that translates into a bigger bench.
Still not convinced? Next time you’re at the gym do a set of bench with your feet up—the lack of support makes the lift insanely harder.
The extreme opposite of this is what you want instead: extreme tightness and tension upon liftoff.
- Bring your feet underneath your body
- Raise your chest and think about touching the ceiling with your sternum
- Tuck your shoulder blades back and down
- Grip the bar tight to activate all of the muscles in your forearms and hands—creating a strong link to your triceps, shoulders, and chest
- Pull the bar out of the rack, don’t press it out—if so you will lose all of the tightness from the previous four steps
- Pause with the bar at lockout to get tension in your upper back and traps as the bar compresses you into the bench
- Ensure wrists, forearms, and elbows are all in alignment
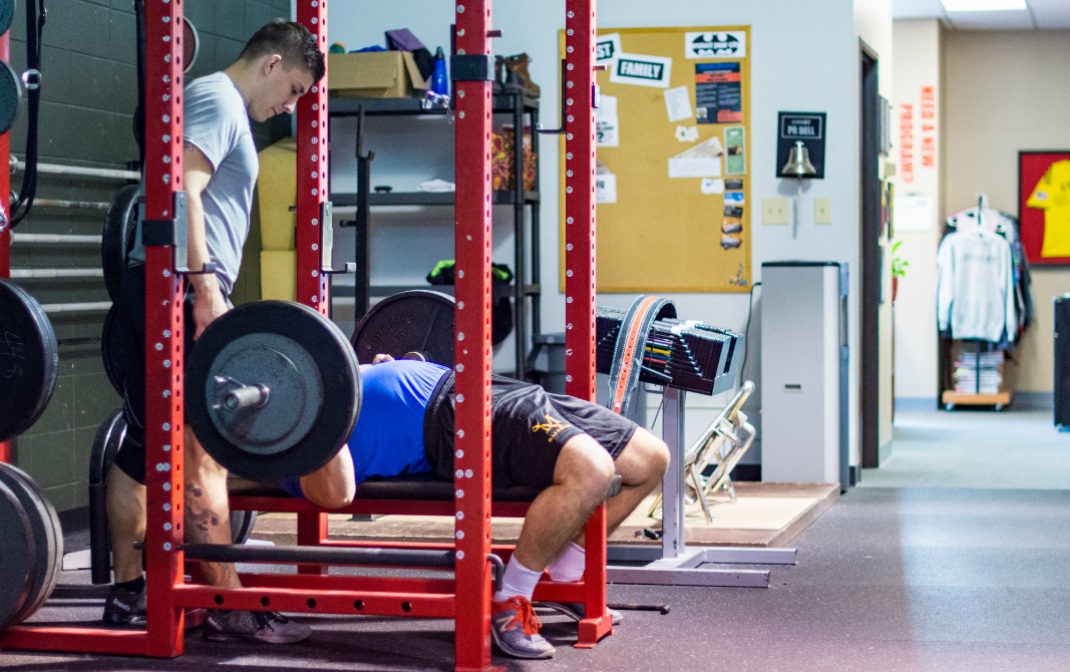
One way to check if you are truly in the best position possible is to have your training partner give you a nudge in the abdomen and knees once you are setup. If he can move you by pushing against you, you’re too loose. You need to become one with the bench. As cliché and corny as that sounds—it’s the truth.
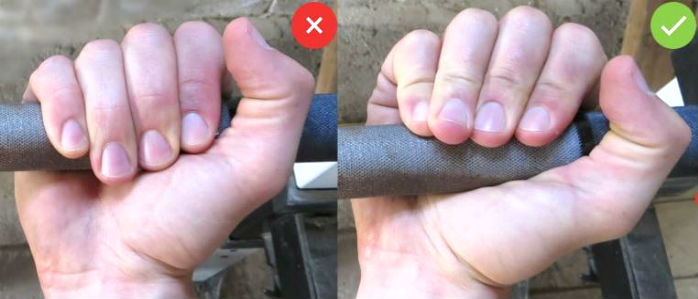
Lastly, make sure to “place” the bar into the meaty section of your hand instead of wrapping your fingers around. The easiest way to do this is to slightly internally rotate your hands.
If it’s still a little cloudy, don’t worry you’re not alone. This video from Bryce of Calgary Barbell breaks it down perfectly.
Taking a reverse grip or suicide grip is not recommended. If you really want, you may swap out close-grip bench for wide grip bench within the program but you must make sure to use at least one of the isolation movements to focus on triceps. However, it is recommended no changes are made. But if you absolutely must, follow the original routine first and any save adjustments for the next training cycle.
Now it’s time to lift the weight.
Lowering the Bar
While positioning is critical, you can’t stop there—you actually have to lift it.
- Break with your elbows to get the bar moving—if you are retracting your shoulders as you start the lift, you’re not tight enough
- Tuck your elbows so that they aren’t flared—flaring your elbows is a one-way ticket to a torn rotor cuff
- As the bar reaches your chest, squeeze your upper back hard for a split second and then flex your lats to get the bar moving
- Touch the bar to the same spot every time—if you’re standing with your arms at your side, it will be wear your elbows relax or slightly higher
One quick and simple way to make sure you’re following number four correctly is to add a bit of chalk to the middle of the barbell. When you complete your set, if you have a bunch of different lines on your shirt—you have some work to do on improving your consistency.
Benching it Up
From a technical standpoint, this may be the most important aspect of the lift to fully grasp.
When you are benching, you need to feel as though you are pushing yourself away from the barbell and into the actual bench. This is done by altering the bar path—the way you bring it down is not the same way you push it back up.
Take a look at this now-famous bar path image showing the difference between a novice lift and a world record bench press.
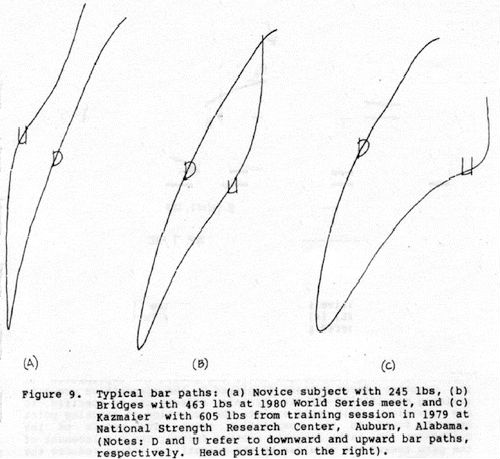
As you can see, the descent path is very much the same for all three. The ascent path, however, tells a very different story.
In the elite lifter, we see that the bar is being pushed back while also pressing up. This slight change in positioning allows for greater recruitment in the triceps and front delts without sacrificing any power in the chest. It takes some practice to perfect, but just having this concrete idea of what it should look and feel like is a huge first step.
Shoulder and Elbow Pain While Bench Pressing
If you feel discomfort or sharp pain in your shoulder, it’s because you aren’t tucking enough. You are more than likely flaring your elbows which takes the load off of your strong chest and back muscles and puts it all on the shoulder joint.
To fix this, really focus on getting into a tighter position where your scapula are pulled back and down. Additionally, make sure you are tucking properly. Taking a quick video of your lift is the quickest and easiest way to address this.
If you are feeling elbow pain, it is almost always because you don’t have stacked joints.
“Stacked joints” simply refers to having your wrists, forearms, and elbows all in alignment. This does two things. First, it relieves any pain you may be having and prevents it from happening in the future.
Secondly, it provides a better biomechanical position. You no doubt learned in grade school that the shortest distance between two points is a straight line—those basic physics still apply.
Still confused? Take a look at this diagram:
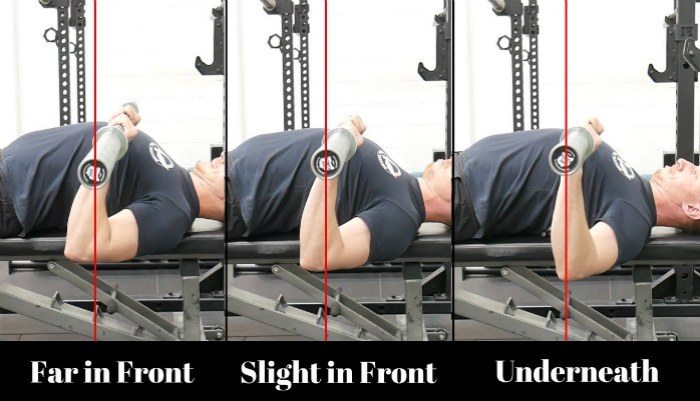
On the left it a clear case of elbow pain—they are far in front of the barbell, requiring the triceps and elbow extensors to carry an enormous amount of load.
The left is where you want to be, with everything in alignment. Also notice that the elbows are tucked to the side of the body and not flared to avoid any shoulder discomfort.
Armed with in-depth knowledge and proper form, you are now ready to begin.
Powerlifting Bench Press Pyramid Program
While each plan is designed using the same training methodologies, they differ in length to provide you with the best option to suit your specific schedule and needs.
Whether you are looking for a 30 day bench press program or a 12 week cycle, you’re covered.
If you are an intermediate or advanced lifter, micro-loading is non-negotiable for optimal progress. As you become stronger and become unable to can’t add 5-10 pounds with each session, you still need to progress!
How can you do this? Micro-plates.
These allow lifters to add only one or two pounds to the bar to ensure progress is met on upper-body lifts where adding 5-10 pounds per session becomes impossible. You can get away without using them, but just know you may have to stay at the same weight for several weeks until you can move up a full 5-10 pounds.
It is worth pointing out now that no lower body exercises are included as everything is highly focused around bench. If you are looking for the best program for strength in all three lifts, you should be reading the DUP program. If you are a novice or beginner, you should be reading the 5×5 program.
Before getting started you will need to calculate your max. You can use a strength chart, but this can be done very easily using Epley formula and is something you should know and be able to do on the fly for all lifts.
Pick a weight that you can do about 3-6 repetitions with, bust out the set, and then do this calculation:
One Rep Max = (Weight Lifted * Number of Repetitions)/30 + Weight Lifted
For example, if you lift 225 for 5 reps, your max is roughly 263 pounds: (225*5)/30 + 225.
When working through the program you will find various percentages which correspond to an RPE as discussed earlier. This chart (same as above) is a quick way to find out how hard your sets should be:

4 Week Program

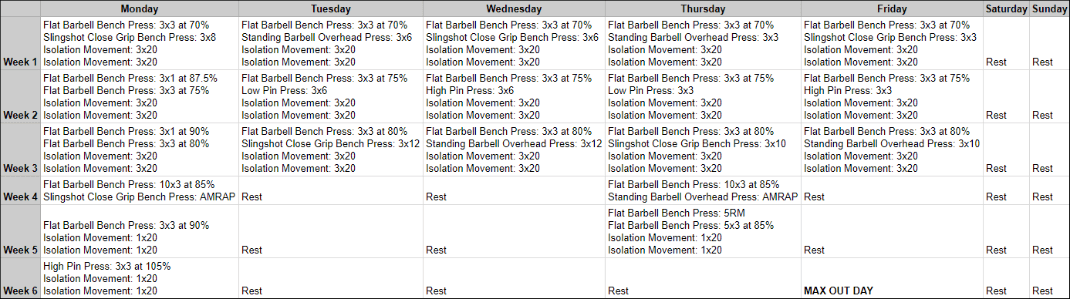
6 Week Program
8 Week Program
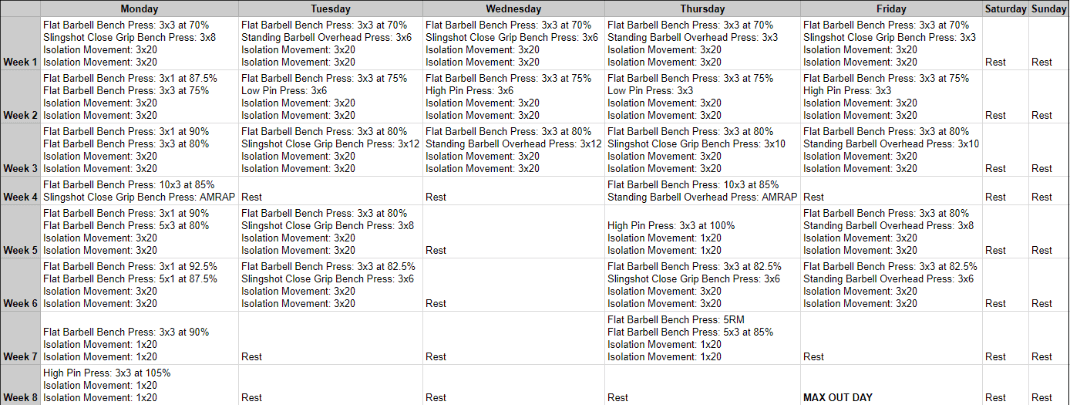
10 Week Program
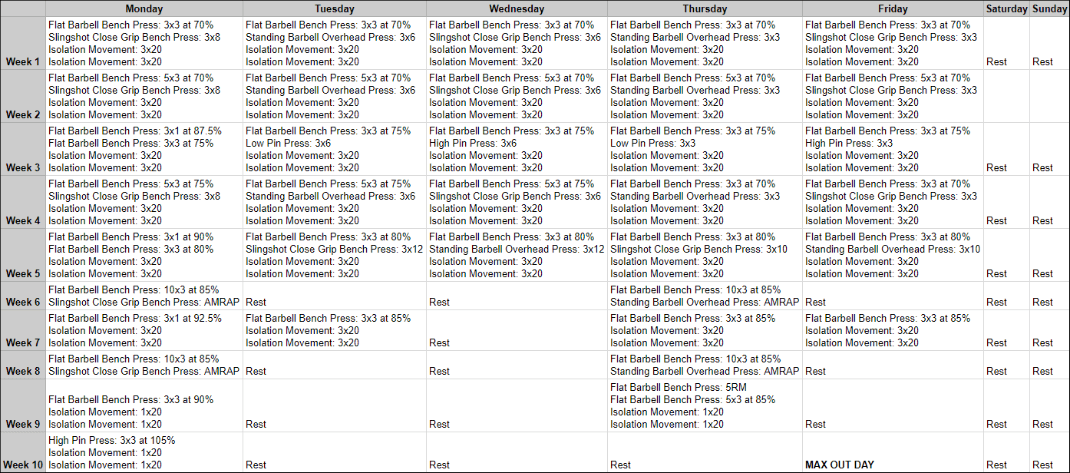
12 Week Program
If you are working with a timeline of 12 weeks, the best option is to do two cycles of the 6-week plan. This will provide you with two max fatigue phases, two high volume stages, two super-compensation phases, and two max-out phases.
Isolation Exercises
As you have probably noticed, there are no specific isolation movements listed. Variety is the key here—choose different exercises as often as possible to target your bench muscles that are lagging the most.
With that said, if you find that the main movement and accessory movement is leaving you drained and fatigued, just treat the isolation sets as active recovery and use light weight.
You should ideally be rotating between chest, shoulder, and back movements. This will ensure the third fundamental principal described in the intro to this article is covered and you’ll be on your way to a two plate bench as most gym enthusiast wonder how many people can bench 225 pounds, and you’ll proudly be able to say you’re one of them.
Frequently Asked Questions
Q: Why don’t the accessory and isolation movements have percentages and RPE?
A: Explained earlier in the article, the sole purpose of accessories and isolation exercises is to increase your bench press—not set a world record on reverse tricep kick-back extensions.
On the RPE scale, your accessories should be registering a 9. They should be challenging but shouldn’t be so heavy that you have to get amped up to complete them.
The isolation exercises shouldn’t be loaded heavy—they are designed to provide direct stimulus to the smaller muscle groups and therefore do not require much, especially with the enormous amount of benching being done.
Q: What does “AMRAP” mean?
A: “As many reps as possible”—10 RPE but not failure. Your last repetition should be an all-out grinder.
Q: What does “5RM” mean?
A: “5 rep max”—use a weight that you can do for roughly 5 reps.
Q: What are high and low pin presses?
A: For these you need to bench press in the squat rack and set the pins just below lockout for high presses, and just above the chest for low presses.
High Pin Press

Low Pin Press
Q: What if I don’t have a slingshot?
A: Complete the same sets without; you won’t benefit from the overloading benefits programmed to target your lockout for max-out day, but can still use the sets for more volume.
About the Author