A deadlift workout, if it is designed correctly, is the number one way to skyrocket strength and pack on muscle mass in the shortest time possible. In this case, the strength training programs below are 8-10 weeks long, or 70 days at the most.
It’s simple, really. Deadlifts are known as the king of all lifts.
They’ve earned their noble title for a reason: they stress almost every single muscle in the body–more than any other lift–and produce large anabolic hormonal changes (the hormones responsible for strength and muscle).
Furthermore, a deadlift workout program is perfect for a beginner lifter who’s looking to build a solid foundation of strength and muscle mass, athletes recovering from an injury or break, or anyone trying to bust through a strength plateau.
In fact, experts agree that a deadlift program should be integral part of any strength-building plan. But, knowing exactly where to start can be a bigger challenge than actually executing the exercise.
The information in this article will revolutionize your strength and muscle progress and results–if you let it.
Many important things are covered below:
- How to do a proper deadlift by breaking down the movement in-depth
- How to optimize form for maximum strength and muscle
- How deadlifts can change your life (seriously)
- The different types of deadlift variations
- How to develop your own deadlift routine
- And of course…the absolute best deadlift workout programs out there (Ed Coan and Jonnie Candito can confirm)
So buckle up, get out your notepad, and prepare to make progress.
Fast.
Learning How Deadlift: Conventional Deadlift Workout Basics
Like all exercise, if done improperly, deadlifts can cause serious injury. If there’s one lift that really gets a lot of undeserved hate though, it’s deadlifts.
Yes, using poor form and too heavy of weight can hurt your back. That’s called common sense.
But in the sea of vocal weaklings trying to scare you away from deadlifts, you should be aware of a very important fact: becoming strong and effective at deadlifts is one of the easiest, most sure-fire way to avoid becoming injured in day-to-day life and in the gym.
When your grip is tight, your lower back is strong, your upper back is robust, your legs are developed, your arms are jacked, your abs are solid, and your traps are thick–it’s much harder to get injured.
Contrast that with the gym bros doing curls and benching on the smith machine. There’s no comparison.
Knowing the proper form (spine, hip, and knee movements) and the right grip does two things:
- It makes sure stress is being placed on the muscles so that they can grow and become stronger–not the joints and supporting soft tissues
- The optimized technique allows you to lift more weight, thereby building more strength and muscle, which then lets you lift more weight…you get the picture
Whether you mostly pull conventional or sumo, knowing the concrete fundamentals of both variations is absolutely essential if you plan to become good at them and reach elite levels of strength and muscle.
Ed Coan, considered the greatest powerlifter of all time, breaks it down for Mark Bell and everyone else in an awesome video:
Note: the following instructions are for conventional deadlifts–information on sumo pulling is further down below!
The Proper Deadlift: Do it Right
A deadlift is a full-body movement, and when done correctly, athletes should not feel pain in the back. The strain, and subsequently the muscle definition, should be more in the hamstrings, glutes, and back muscles, not the spine, although deadlift sets do target the spinal erector muscles.
Although good form helps prevent injury, it’s important to understand that there is always risk involved with deadlifting, or any exercise. However, by maintaining the correct stance and movement, the weight load will be properly distributed. Likewise, it ensures the maximum return for the effort.
Good form also means creating an efficient barbell path from the floor to the lockout position. This will maximize the weight used, and therefore maximize the progress made.
First, this article will examine the basic (conventional) deadlift, then sumo, and finally explore the other types of deadlift variations available before showing you the best possible program to boost your pulling numbers.
Start With The Hip Hinge
When learning how to do deadlifts, the hip hinge is a crucial motion. Rather than using quads to perform the pull, the hip movement helps retain the proper form, eliminating strain on the knees and keeping the spine in a neutral position.
The role of the quads in the conventional deadlift is to anchor the tibia (lower leg bone), and keep the knee extending to oppose the contraction of the hamstrings.
In practice, the hip hinge is essentially the moving of the hips from full closing (flexion—when the knee is at the chest) to opening (extension—standing position, or leg behind the torso), while maintaining nearly no movement in any other joints. Of course, the hip joint is a ball, so it can rotate and move other directions, providing a range of motion.
When hinging the hip, the upper body should be braced (partly through the correct breathing technique, see below), and below the waist the hamstring and gluts are tensed. The only large motion originates, and is contained, at the hips, not the knees or back.
Stance Width
The width of the stance has an impact on the amount of weight that can be lifted. However, each person has their own ideal stance width, depending on a number of factors including body type (height, arm length) or personal preference.
One good method for determining stance width is to do a standing jump. Where the feet are located before ‘liftoff’ is a good place to start. Also, setting the feet hip distance apart is a good beginning point. Most lifters experiment after their form is solidified, to see what will work to create the strongest stance.
Toe Angle
There are benefits and drawbacks to various toe angles, but the main thing to remember is other than in a rare, very wide sumo stance, keeping the toes and knees aligned is vital.
Turning the feet out a little farther aids in breaking the bar off the floor slightly and generating a bit more speed at the beginning.
Pointing the feet straighter seems to deliver more lockout strength, but these variations only contain slight differences for the deadlifter who wants to refine his or her details.
Developing The Proper Grip
Once the feet are set deliberately in a balanced stance and the tow-angle is set, grip width and execution are the next steps.
Take the narrowest grip possible, without forcing the knees to squeeze in or producing undue friction between the arms and thighs.
A grip that’s too wide just increases the physical distance required to pull the bar, which is a less efficient motion and limits the amount that can be lifted. Likewise, if the grip is too narrow, the knees adjust, limiting the weight.
Basically, if the arms are just touching the thighs the width is solid.
Grip Style
There are four main grip styles. Double overhand, mixed grip, hook grip, and the double overhand combined with straps are the prominent grips although there’s a debate when it comes to hook grip vs mixed grip. It’s good to remember that the grip should be located on the knurling, not the smooth part of the bar.
- Double Overhand is like it sounds—both hands grip the bar with palms facing downward.
- Mixed Grip (aka Over-Under grip) uses an overhand and underhand grip to grab the bar.
- Hook Grip involves gripping the bar with a double overhand grip, and then wrapping the fingers around thumb, pinning it between your fingers and the bar (instead of putting the thumb on top in overhand).
- The Double Overhand with straps is designed to stop the bar from rolling.
There are benefits to each grip, but generally, a double overhand is the least effective and severely limits the amount of weight that can be lifted. It ends up toning the grip strength, but not the muscles the deadlift is designed to challenge.
The overhand grip places a maximum amount of pull straight down (acceleration of gravity 101), on the weakest part of the grip—the opening—which causes the bar to roll.
The mixed grip is the most popular among competitors. One hand grips over the bar, and one hand under the bar, which maximizes the amount of weight that can be lifted because it prevents rolling.
There are a couple of common mistakes made with the mixed grip. The first one is gripping the bar too deep into the palms, which pries open the hands. The bar should be set just above or just below the calluses at the base of the fingers (not higher up in the grove of the thumb).
The second mistake is trying to ‘row’ the bar, using the biceps. The upper arms should be relaxed in order to help prevent muscle tears. This is one of the biggest reasons people switch over to hook grip (read below)–it’s much safer.
Research shows there is plenty of bicep action on the arm gripping from the underside, so many people alternate which arm grips that way during deadlift sets.
If you are going to use mixed grip, make sure to alternate evenly between both sides for even muscular development.
With the hook grip, the bar is grasped with a double overhand, and the fingers wrap around the thumb. The hook grip is, hands down, the best grip to use. It is the strongest and also places the hands in a position where the quads can’t “open up” the hands at the top of the lift–a very common issue for strong lifters.
Additionally, it is much more symmetrical of a position than mixed grip. By having both palms facing down, the bar is able to hang lower (less distance required to travel = more weight lifted) and the back is able to engage equally on both sides. This prevents the uneven development that mixed grip is so well known for.
While it will take some practice, with time you will quickly find that hook grip is more comfortable than any other grip. Your body will adapt and it will no longer be painful in the same way.
Bryce from Calgary Barbell of Canada lays it out:
Using straps works essentially the same way that the hook grip does, and allows the arms to hang symmetrically alongside the body.
Best Breathing Techniques to Use During a Deadlift Workout
Like all forms of exercise, breathing provides a crucial role in a person’s ability and performance. To achieve the best deadlift results, use deep breaths taken from the stomach, not the chest. This helps brace the torso by delivering more intraabdominal pressure to support the spine.
Hold the breath throughout the lift, and then exhale, if needed, at the top of the lift, or when the bar is back on the ground between repetitions.
Performing The Proper Deadlift
With the basics out of the way, it’s time to take a look at the various Setup techniques.
There are at least five ways to set up for the conventional deadlift, not including the various other deadlift styles like Sumo. The following information can help indicate which one will work best for each person’s body type.
Best Setup Techniques for Pulling—How To Do A Proper Deadlift
There are several different techniques that can be used when initiating, and completing, a proper deadlift. Some are more suited for beginners than others and it will ultimately come down to the individual to determine which technique best suits their biomechanical makeup–and thus lets them lift the most.
Option 1. Hamstrings tense, back tight as you approach the bar.
Set the feet, then bend over and grip the bar by moving the hips back, with a slight bend in the knees and spine flexed. Keeping hamstrings tight, take the breath, while the hips go back and lower spine is extended. Pull the chest high and then pull the weight.
Option 2. Back tight, legs compressed.
Same approach as before, but this time, the back is extended, the body is hinged at the hips and knees bend to grip the bar. With a tense core and tight upper back, the hips are pulled into position so that the legs feel like a coiled spring, compressing against the floor.
Start the pull.
Option 3. Rock the hips into position.
This time during the grip, make sure that the body weight is shifted forward on the feet. Rock the hips back into place and transfer body weight to the middle of the foot, then pull.
Option 4. Clean pull, hips start low.
Grip the bar and sit back into a squat position with the spine extended, weight behind the bar, and the bar resting slightly against the shins. Keeping the spine extended, drive through the floor with the legs during the pull.
Option 5. Grip it and rip it.
This technique is not the best for beginners because it requires a very, very solid grasp of form (from having completed thousands of repetitions). The deadlift is performed by hinging down to the bar, gripping it and pulling in rapid succession.
Again, this isn’t for beginners–the guy in the video below, John Haack, is one of the strongest men on the planet.
Bar Path
To make the deadlift a little more efficient—less front-to-back deviation in the path—the center of gravity should stay over the middle of the foot. This means your shoulders should be directly over the bar, not in front of the barbell.
Do this by engaging the lats, depressing the scapulae, and pulling the shoulders down and back. As you build tension in your setup and pull your shoulders down and behind the bar, you should feel like a spring compressed and ready to blow. This is exactly how it should feel.
In simplest terms, it establishes a more linear path for the bar to travel. The results of the method have been studied.
Performing the Pull
By this point, everything linked to the setup is done, the stance and grip are set, the breath is taken and tension in the body prepared.
Now it’s time to actually perform the pull.
One of the biggest elements of picking an extremely heavy bar off the ground involves the mindset.
- Don’t focus on the bar, or think how to ‘pick up the bar.’ If that happens, generally people round their backs and increase their risk of injury.
- Extend the knees and hips while keeping the spine stiff. It can help to think ‘chest up,’ because by doing that, it requires the body to extend the thoracic part of the spine.
- Think about driving the floor away, rather than pulling the bar up from it. The mental aspect may not make perfect sense, but it works. Plus, it helps people keep their hips from rising too fast at the beginning of the pull.
After the first few inches though, hip extension is the key. Once the bar is airborne, the quads are basically done, and extending the hips without allowing the spine to flex is the important part.
This is absolutely key. What this does it prevent anterior pelvic tilt (APT) from placing the load of the barbell on the wrong area–aka your lower back and spinal erectors. No clue what APT is and how it can destroy your deadlift?
Watch this:
https://www.youtube.com/watch?v=_DmnVrza93c
Classic “shoulders back” and “hips forward” are still used for a reason… they work. Here’s an exercise that shows the hips forward movement.
Perform each repetition with power, but only once the form is down pat.
The lift is complete once the spine, knees, and hips are straight and the athlete is standing in a natural position. This is known as the as lockout.
Don’t hyper-extend the lower back during lockout. If you are, guaranteed you aren’t engaging and using your glutes properly. On top of that you’re much, much weaker. There’s no payoff and it can be dangerous. The ‘hips forward’ task is accomplished by focusing on driving forward in a thrusting motion with the glutes.
Use lighter loads to build the perfect lockout position, then increase the weight.
Controlled Lowering
Once the lift is done, don’t neglect the final step, which is setting the bar back on the floor. After spending so much careful planning in the setup and execution of the deadlift, not using the same precision when putting the bar down can be just as risky as improper form when lifting.
Basically, set the bar down under control, with the spine extended.
Don’t:
- Drop the bar.
- Let the spine round.
- Release the bar willy-nilly.
Controlling how the bar is lowered is important for a number of reasons.
- Getting eccentric exercise, aka resistance training, is an excellent form of growth promoting stimulus. It is especially effective for rehabilitation, and all sorts of physical illnesses, because it builds muscle. It’s included in almost every other exercise. For example, during a bicep curl, when the weight is lowered, that’s the eccentric movement. If you are doing a deadlift workout for lots of reps, this is key! Don’t drop the weight.
- Staying safe is an important part of any exercise regimen, if the bar is dropped, the form suffers, unnecessarily increasing risk of serious injury. Plus, allowing the bar to drop is not safe. Depending on the amount of weight and the height of the drop point, it could bounce, roll, or do other unexpected damage. Murphey’s Law operates in the gym too. But perhaps even more importantly–it ingrains terrible habits. If you get used to dropping the barbell in the gym, you will undoubtedly do it during a powerlifting meet and get three big, fat red lights.
- Keeping the body physically and mentally prepared for the next rep is almost impossible if the bar is dropped.
The best rule of thumb is to lower the bar the same way it was picked up. The chest stays up, hips are back until the bar is at the knee, and legs continue pressing through the floor as the bar is lowered. Keep control and make sure it makes contact lightly.
How to Sumo Deadlift
The sumo variation of deadlifting offers the same benefits as the conventional style, but trying both techniques for a while can help indicate which style is best for each specific person.
BUT, many many elite lifters are very big proponents of doing both. AKA by alternating between sumo and conventional you keep the variation high while also–somewhat counter-intuitively–keep the specificity high. If you aren’t doing both, you’re not going to be as strong as you could be in your main variation of choice.
Although it used to be thought that the key difference between the two involved the hip extension and glute activation, recent studies have debunked that idea.
When comparing the sumo and conventional deadlift, at no point in the movement was there a significant difference in hip extension demands. In another study, EMG readings for the glutes and hamstrings were the same for both deadlift techniques.
However, there are a few differences:
Sumo deadlifts are harder on the quads, according to new research. Also, conventional deadlifting can be harder on spinal erectors, by about 10 percent.
In other words, sumo works the quads more and conventional works the back more. If you’ve been in the gym for long you can attest to this personally.
The best rule of thumb is to do both, then choose the one that feels the strongest and most comfortable with submaximal (70-80 percent) weight…but still do both. They are highly complimentary movements and getting stronger in one will absolutely add to the other.
Stance
The sumo requires a wider stance, with hands placed on the bar inside the feet. The shins should be roughly perpendicular, after the knees are placed as far out as possible. The feet also turn out the wider the stance gets.
So, in a ‘moderate’ stance, the feet are roughly twice as wide as shoulder width, with hips each abducted (pointed out) 45 degrees. Therefore, the feet should turn out about 45 degrees.
Grip
The grip styles and rules are the same as for the sumo and the conventional lift, but there will be more room to try various widths with the knees out of the way. Gripping the bar with hand directly below the shoulders minimizes the length needed to pull.
Set Up
In the sumo deadlift, as the hips are pulled into position, apply pressure to the floor like it could rip apart as the feet spread. This one queue will go a LONG way.
It’s good to imagine a fault line breaking through the earth, and the feet are pushing it farther apart. This will result in good tension in the hips and quads–and entire posterior chain.
Not Doing a Barbell Sumo Deadlift? (Dumbbell Sumo Deadlift)
If you are using a dumbbell instead, the basic concept is the same, with the exception of the setup which will require the hands to be much closer, thereby making it harder to fully pull the shoulders back and down at the top of the lift.
Just make sure you are aware of this form difference and focus on keeping a tight back with shoulders down and back.
Conventional vs. Sumo Deadlift: Muscles Worked
Described above, conventional pulls target the spinal erectors and upper back roughly 10% more than sumo pulls. On the flip side, sumo leads to 10% more activation in the quads.
This is why it is so important to make sure you are incorporating both types into your program. When it comes to the rest of the muscles involved, they are very much involved in the same way.
- Forearms gripping the bar
- Triceps keeping the arms locked out
- Upper back and rear delts keeping the shoulders down and back
- Lower back tense to provide stability
- Spinal erectors firing to keep the chest up
- Quads driving into the ground
- Glutes squeezing the hips forward
It doesn’t stop here. There is a whole host of smaller muscles in the posterior chain and back that are used during a pulling workout.
Other Types Of Deadlifting
Introducing variety in the deadlift routine can have a tremendous impact. Although the conventional deadlift provides a great starting point, trying out variations like ‘touch and go,’ deficit, pause reps, and rack and block pulls will help solidify the concept of legs ‘pushing the floor’ and provide a steady way to increase the amount of weight that can be lifted.
Make no mistake…one of the fastest ways to increase your deadlift is to follow the segment method.
Touch and Go
This deadlift variation builds muscle and improves grip and overall strength. In a conventional lift, there is a pause between reps, but with touch and go, never release the bar once it hits the floor.
For example, grasp the bar firmly and retain tension during a five rep set. Typically, the touch and go variation can be used with heavier weights around 70-90 percent of your maximum pull.
Pause Rep
As the name implies, when the bar reaches the mid-shin level off the floor, a 2-3 second pause is held. This variation gets lats more involved, but it shouldn’t be performed with heavy weight. A good rule is 50-60 percent to begin with then gradually build the weight as the muscles get stronger.
Jonnie Candito’s Deadlift program is a huge proponent of these. He does them heavy. And he does them often.
You should too.
Rack and Block Pulls
Again, just like the name implies, this variation begins on a rack or block, and helps target concentric strength and lockout position. The bar is placed on a rack or blocks so that it’s shin height, just below the knee cap. Don’t use this variation with the touch and go, it’s designed to allow more weight and increase back strength.
This is a good technique to try different types of deadlift bars to see which ones deliver the best results.
Deficit Deadlifts
This is similar to a hitter adding weight donuts to his bat during practice swings. The lift is performed from a higher footing, such as a platform, block, or large flat plate. Like the pause rep, 50 percent weight should be used because a deep squat position is required to prevent this variation from becoming a straight up stiff leg pull.
Romanian Deadlift
These start from the top of the lift, and either begin with a normal lift, or on a power rack, and are effective for isolating the hamstrings.
Ed Coan Deadlift Program (Powerlifting Legend)
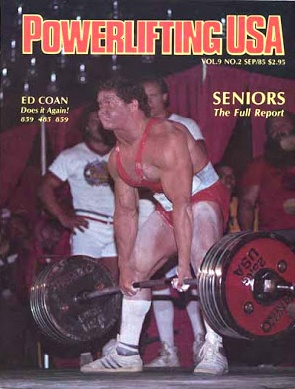
Ed Coan is considered the GOAT of powerlifting.
Another variation to the deadlift workout was developed by Ed Coan, a man many consider the greatest powerlifter of all time.
Get the Ed Coan Deadlift Program with included calculators delivered to your email immediately! Note that it is still highly recommended to read this article in full to understand how the program functions and how to properly use it to maximize your progress.
His 10-week deadlift cycle isn’t for beginners (Starting Strength or GSLP are much more appropriate and will even provide more results for a novice).
But for people who want to overcome a strength plateau or max out on their deadlift progress–and who’ve been pulling consistently heavy in their training for at least 12 months–it works nothing short of amazing.
The program involves speed work to get in high volume pulling, heavy sets at the start of the workout, and various back assistance exercises. Speaking of accessories, before moving on you need to check out this Calgary Barbell video on the absolute best accessory movement for deadlifts.
The 10-week routine is used alongside an athlete’s current deadlift workout, and it requires that the lifter know his or her current one rep max (1RM) and the desired 1RM. The average desired is about 30 pounds more, and all the deadlift set percentages are based off that maximum.
Ed Coan Program Breakdown (And Deadlift Chart)
Coan developed the method to mimic the situation during a meet, so the first four weeks focus on working up to a heavy top set, then decreasing the amount to concentrate on speed and acceleration.
The final six weeks focus on peaking, as the volume will start to decrease and the rest periods between the speed deadlifts get longer.
Accessory work is planned for the first nine weeks of the plan.
Weeks 1-4 are completed in a circuit format. However, weeks 5-6 aren’t performed in a circuit, and in weeks 7-8 the volume drops. During week 9, nearly all assistance training is dropped–as well as volume.
It is crucial before beginning this or any other regimen to consult with a physician. Also, always perform the normal warm ups before attempting Ed Coan’s deadlift program.
*All percentages are based off of the Desired 1RM (which should be ~30 pounds heavier than your current 1RM)
| Week | Work Sets | Speed Sets |
| 1 | (75%) x 2 reps | (60%) 8 sets x 3 reps (90 sec rest b/w sets) |
| 2 | (80%) x 2 reps | (65%) 8 sets x 3 reps (90 sec rest b/w sets) |
| 3 | (85%) x 2 reps | (70%) 6 sets x 3 reps (90-120 sec rest b/w sets) |
| 4 | (90%) x 2 reps | (75%) 5 sets x 3 reps (90-120 sec rest b/w sets) |
| 5 | (80%) 3 sets x 3 reps | (65%) 3 sets x 3 reps (120 sec rest b/w sets) |
| 6 | (85%) x 2 reps | (70%) 3 sets x 3 reps (120 sec rest b/w sets) |
| 7 | (90%) x 2 reps | (75%) 3 sets x 3 reps (120 sec rest b/w sets) |
| 8 | (95%) x 2 reps | (70%) 3 sets x 3 reps (120 sec rest b/w sets) |
| 9 | (97.5%) x 1 rep | (70%) 2 sets x 3 reps (Rest as needed) |
| 10 | (100%) x 1 rep | (60%) 2 sets x 3 reps (Rest as needed) |
| 11 | Meet day | Meet day |
Assistance Work
Power Shrugs (free weight barbell exercise targeting the traps, forearms and shoulders) are added starting at week 5.
Very important to note: base the deadlift shrug amount on the original 1RM deadlift, not the desired 1RM.
Weeks 1-4 (Circuit Chart)
During the first four weeks, four assistance exercises are executed. They must be performed in circuit format, with 90 second rests between each. Do not superset.
Perform eight reps with each exercise and take two-three minutes breathers between circuits. Do a total of three sets for each exercise with 8 reps each.
| Exercise | Reps | Rest Period |
| Stiff Leg Deadlifts | 8 | 90 seconds |
| Bent Over Rows | 8 | 90 seconds |
| Underhand Grip Lat Pulldowns | 8 | 90 seconds |
| Arched Back Good Mornings | 8 | 2-3 minutes |
| *Repeat circuit 3 times | ||
Week 5
During week 5, don’t circuit, but perform each exercise for three sets of five reps. Rest for one-two minutes between sets.
| Exercise | Sets x Reps | Rest Period |
| Power Shrugs | (60%) of Original Deadlift Max 3×5 | |
| Stiff Leg Deadlifts | 3×5 | 90-120 seconds |
| Bent Over Rows | 3×5 | 90-120 seconds |
| Underhand Grip Lat Pulldowns | 3×5 | 90-120 seconds |
| Good Mornings | 3×5 | 90-120 seconds |
Week 6
Week 6 is treated the same was a week 5, but the power shrugs weight is increased 65 percent.
| Exercise | Sets x Reps | Rest Period |
| Power Shrugs | (65%) of Original Deadlift Max 3×5 | |
| Stiff Leg Deadlifts | 3×5 | 90-120 seconds |
| Bent Over Rows | 3×5 | 90-120 seconds |
| Underhand Grip Lat Pulldowns | 3×5 | 90-120 seconds |
| Good Mornings | 3×5 | 90-120 seconds |
Weeks 7
Still not circuiting, the sets decrease to two, with five reps.
| Exercise | Sets x Reps | Rest Period |
| Power Shrugs | (70%) of Original Deadlift Max 2×5 | |
| Stiff Leg Deadlifts | 2×5 | 90-120 seconds |
| Bent Over Rows | 2×5 | 90-120 seconds |
| Underhand Grip Lat Pulldowns | 2×5 | 90-120 seconds |
| Good Mornings | 2×5 | 90-120 seconds |
Week 8
For week 8, increase the weight for power shrugs to 75 percent.
| Exercise | Sets x Reps | Rest Period |
| Power Shrugs | (75%) of Original Deadlift Max 2×5 | |
| Stiff Leg Deadlifts | 2×5 | 90-120 seconds |
| Bent Over Rows | 2×5 | 90-120 seconds |
| Underhand Grip Lat Pulldowns | 2×5 | 90-120 seconds |
| Good Mornings | 2×5 | 90-120 seconds |
Week 9
During week 9, there are no circuits, and only do the power deadlift shrugs and stiff leg deadlifts listed. Execute each exercise for two sets of five reps.
| Exercise | Sets x Reps | Rest Period |
| Power Shrugs | (75%) of Original Deadlift Max 2×5 | |
| Stiff Leg Deadlifts | 2×5 | 90-120 seconds |
During week 10, no additional accessory exercises are performed as the final stages of peaking take place.
Progression and Gain
The potential gain from this routine will be based on the desired 1RM, but around 30 pounds is the average. Each week generally sees an increase of five pounds.
Click here to get the deadlift max chart.
Program History and Deadlift Tips
Coan originally created this routine for Mark Philippi, who was having difficulty with his deadlift. He added 35 pounds.
These deadlift tips can help:
- Don’t go crazy with the desired 1RM amount. Failing lifts is not fun. Advanced lifters know this very well: the more conservative you are with your desired 1RM, the more motivating it is when you crush it out of the water. Contrast this with setting a 1RM that’s unfeasible, working your butt off for 10 weeks, and then failing.
- Keep with the scheduled program, even if one week is missed. Lifters can do the week that was missed the next week, it will just mean that it’s finished one week later.
- The assistance work is crucial, and the weight is generally 60 percent.
- It’s possible to hit the “deadlift 405 challenge” (as part of the 1/2/3/4 Plate club) with this program, but depending on where the initial 1RM is, it may take time. Just be patient, pick smart weights, and stay consistent.
Why Bother Following A Deadlift Powerlifting Program?
Many people wonder if a deadlift powerlifting routine is actually worth it. The short answer is, yes: if you had to choose a “exercise-focused” plan to follow, this would be it–the plan that increases your deadlift and thus works almost every muscle in the body.
Fundamentally, deadlifting is one of the most effective exercises for building the strength, muscle size, and athleticism.
Because it employs the entire body, it also builds total-body muscle and improves posture.
What Muscles Do Deadlifts Work?
Deadlifting is one of the few lifting techniques that directly targets the hamstrings, and it works the glutes, lats, and core because it is a comprehensive exercise.
Identifying the Deadlift Muscles Worked
- Legs: During the deadlift, the hamstrings and glutes straighten the hips. To a lesser extent, the quads straighten the knees and the calves straighten the ankles.
- Back:The muscles in the back contract while the lats keep the weight close to the body. More than any other exercise, deadlifting offers the ability to work the entire back with heavier weights. Likewise, deadlifts makes weak backs stronger, especially the lower back, increasing endurance and building safe movement habits.
- Traps: The trapezius muscles contract to maintain the placement of the shoulders and transfer force to the bar.
- Abs: During the deadlift, the abdominal and oblique muscles contract, and the heavier the weight, the stronger and more muscular they’ll become.
- Old Man Grip: there is really no better way to increase grip strength than with a regular deadlift routine.
When combined with 5X5 deadlift, the whole body is conditioned and strengthened.
Understanding Deadlifts for Weight Loss
Because the deadlift is a comprehensive exercise, there are definite weight loss benefits produced by it when combined with diet and a regular workout.
First up, the obvious one: it burns more calories than any other exercise out there.
Period.
More than squats. More than benching. More than treadmills and elliptical machines. More than curls or the silly machine in the corner.
The science proves it: endurance training deadlift sets have been shown ‘most effective’ in weight loss and management strategies.
Like all muscle building exercises, as fat is replaced by muscle, cardiovascular fitness is also improved and metabolism is increased so there’s a huge calorie burn during and after the workout. As you build more muscle, you naturally burn more fat. As you burn more fat, your anabolic hormones increase (testosterone, growth hormones, etc.), allowing you to build muscle easier–which then allows you to lose fat easier.
It’s a positive, vicious cycle.
Deadlifts also help avoid stagnation and boredom from doing the same old squats, and reduce pain while improving mobility.
Studies show people gained better coordination in the hip and knee joints after a 6-week program that included deadlifts.
Moreover, deadlifts will improve bone strength and reduce chance of fracture.
If you are attempting weight loss using deadlifts, make sure that your diet is in check and that you are eating enough to recover properly, while still shedding the pounds.
How to Increase Deadlift Weight Fast
Many athletes reach a strength plateau and get frustrated when they can’t surpass it. However, there are a number of methods available to break through a weight barrier and finally hit that 500 pound deadlift goal, and beyond.
Another Increase Deadlift Program by Chris Holder of Cal Poly
As mentioned above, the Ed Coan program is an effective way to add 20-30 pounds to the 1RM, but Cal Poly’s 8-week program is also designed to overcome that wall.
Get the Cal Poly Deadlift Program with included calculators delivered to your email immediately! Note that it is still highly recommended to read this article in full to understand how the program functions and how to properly use it to maximize your progress.
This program is not designed for beginners. Chris Holder, Head of Strength and Conditioning at California Polytechnic, even recommends getting a coach.
Note: Physiqz offers coaching services at extremely affordable rates: contact us for more info
Like the Coan program, the weeks are broken into phases and training intensity.
- Weeks 1-3: three days of 3 sets of 20 deadlifts
- Weeks 4-5: three days of 3 sets of 10 deadlifts, adding 10 Russian kettlebell swings immediately after each set
- Weeks 6-8: three days of 3 sets of 20
When choosing the correct weight to use, the template does not provide precise numbers so it is important to autoregulate (in simplest terms, choose a challenging weight based on how you feel that day in the gym):
- Mondays: Heavy
- Wednesdays: Light
- Fridays: Medium
It’s important to remember that no other resistance training is performed during this time frame. It’s extremely demanding on the nervous system, muscles, and connective tissues.
Holder recommends:
- Having a completely perfect deadlift technique. The demands of this routine produce huge gains, but it’s easy to let form suffer unless a person has it down to a science.
- These are sprints, not a marathon. The reps are performed with the touch and go technique, so Holder explains that 2-3 percent should be dropped if consecutive reps can’t be executed without pauses.
- Do rest between sets, even 10-15 minutes is fine.
- Do the kettlebell swings using the Russian style (hard and fast) immediately after the set. Men, use a 24kg, women 16kg.
- Only concentrate on this routine for the 8-weeks, no upper body or abs.
When performed correctly, this program delivers impressive results.
More Ways To Increase Deadlift Amounts
Mixing up the way you approach pulling can help you to power through plateaus and reach new levels of strength and muscle.
Deadlift More
Incorporate the deadlift into more than one day of the regimen. Adding an extra day of deadlift training will deliver increased results. Pull the reps explosively, but make sure the form is flawless.
Deadlift Less
Too much of a good thing isn’t always wise. Sometimes it’s a good idea to focus on assistance exercises instead of two-three days of deadlifting.
Switch From Sumo To Conventional, or From Conventional to Sumo
Any time an exercise can be varied to target different muscles, athletes get results. This is true for deadlift results as well. Trying the sumo or conventional style to break a routine targets slightly different muscles, making a difference.
Work On Technique
It really goes without saying, but the form used in the deadlift is crucial to its effectiveness. Slow down the lifts and really focus on perfecting the form to get the ability for stronger pulls.
Always Warm Up
Again, this should be a no-brainer, but before hitting fast doubles at 70 percent of the 1RM make sure to warm up.
Simple Deadlift Workout Routine
Get the Physiqz simple deadlift program with included lift calculators delivered to your email immediately! Note that it is still highly recommended to read this article in full to understand how the program functions and how to properly use it to maximize your results.
Adding the deadlift exercise to the regular workout is not difficult. However, lifters need to remember a few things before incorporating it.
- The deadlift is an exercise that zaps the body. Both the nervous system and the musculoskeletal system are worked hard.
- Do deadlifts right after the warm up. Being fresh helps reduce fatigue related injuries because when the body is worn out, form suffers.
- Combine the deadlift with other assistance exercises, but treat it like any other intense training. For example, letting the biceps rest and rebuild for a day improves the results. The same holds true for deadlifting.
Sets and Reps
For beginners, aim for deadlift sets that include 1-6 reps, with a total of no more than 30. Too many reps invites injury.
Stick with 4-5 sets, and either keep the same weight or gradually increase it in a pyramid fashion. A good rule for beginners is to use weights at 50-60 percent of 1RM.
Assuming a 400 pound 1RM, this is a good general guideline of warm ups and working sets:
- 135 pounds: Two sets of five reps each (warm up)
- 185 pounds: Two sets of three reps each (warm up)
- 205 pounds: Two sets of two reps each (working)
- 225 pounds: Two sets of two reps each (working)
- 245 pounds: Two sets of two reps each (working)
- 260 pounds: Two sets of one rep (working)
- 275 pounds: Two sets of one rep (working set)
What Else To Do On Your Deadlift Day Workout: Accessories
Once a lifter has outlined the day to incorporate the deadlift exercise, the rest is easy. Don’t try to replicate the Hugh Jackman’s deadlift and join the 1,000 pound club in the first week, the exercise should be added slowly.
And don’t forget to add assistance exercises when appropriate.
- Leg press—Builds hamstrings, quads, and glutes
- Kettlebell swing—Strengthens hamstrings, glutes, lower back and builds explosiveness
- Plank—Teaches lifters how to get tight from head to toe
- Farmer’s walks—Builds grip strength
- Rowing—Builds lats and upper back needed for a strong lockout
Items to Help with Deadlifting
Athletes don’t need tons of fancy equipment to execute deadlifts. However, there are some accessories that can intensify and optimize training to produce more results, in less time.
The most obvious item is a quality lifting belt, and doesn’t need much of an explanation.
Deadlift Shoes and Deadlift Slippers
Deadlift shoes and deadlift slippers (which can be 10x better than shoes depending on the individual) are not a necessity for beginner lifters. A flat sole will work just fine.
However, if you can pull more than 315 it is well worth your time to invest in a quality pair of “powerlifting” shoes. There are 3 distinct reasons for this:
- Zero compression in the sole: as you push against the ground, you want every ounce of force to be delivered directly into the floor. Shoes with arched soles–and even flat-soled shoes not designed for lifting–have material that compresses. This is great when you are walking around, but terrible when pulling. This creates large dissapative forces. In other words, you end up losing a lot of force as energy spreads through the compression material of the shoe and not into the ground like it’s supposed to.
- High stability: the shoe is designed to conform to the feet’s curves at every inch, making sure the lifter is truly “locked in” and ready to pull. Furthermore, there is a high-grip material to prevent any slipping. This is especially critical when pulling sumo.
- Metatarsal strap: providing mid-foot stability, the metatarsal strap is a feature that–once you experience–you won’t be willing to give up. It ensures absolutely zero movement or accidental slippage while performing deadlifts and pushing against the floor.
Bands
This is a regular deadlift using elastic bands over the bar, which are attached or anchored to the ground. The tension can help build lockout strength and train explosiveness. Since the band tension increases closer to lockout, lifters need extra momentum to perform the pull.
Bands can also be reversed to provide more resistance at the floor, rather than lockout–aka you can set them up in a power rack to make the starting point easy, but the lockout much harder.
Chains
Draping chains over the bar generally serves the same purpose as bands, but with less load increase (in contrast, bands become very hard to lockout at the top–even light bands).
Chains come in various weights and sizes. They honestly should not be considered–and honestly aren’t necessary–until a lifter is well above 405 pounds. Before then, focusing on more variation will yield the best results.
Gym Chalk
Talcum powder–also known as gym chalk–absorbs moisture and reduces friction, especially linked to body heat. Powder is a primary tool used for competitive powerlifting and Olympic weight events, but it can be messy.
Point blank: chalk is a must. Guaranteed, you will lift more weight by having an iron-tight grip. This is especially true if you are forced to use poor quality barbells found at commercial gyms. While many gyms don’t allow chalk outright, it’s well worth finding one that at least tolerates it.
About the Author