Feeling pain in your knees can be a scary thing—especially if it has never happened before in the past. Acting as a hinge joint, the knee behaves in a seemingly simple way. Looking further beyond the surface, however, we can see it is in fact a very complex region of the body and actually the largest joint within the body.
According to WebMD, most individuals suffer from at least one minor knee injury in their lifetime. Furthermore, a majority of the time, these problems happen in the middle of a strenuous activity such as a sports game or intense work around the house.
Knee Pain Location
Taking a look at diagram 1, you can see that the knee structure is made up of several parts. As you might guess, the medial ligaments attach on the sides, and the anterior and posterior ligaments attach to the front and back respectively.
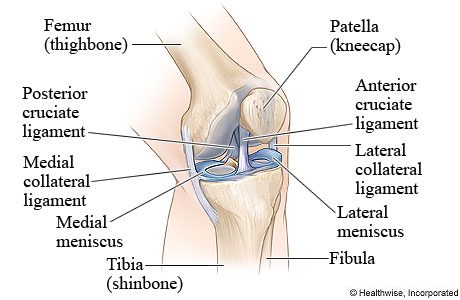
Diagram 1
Diagram 2 provides a front view that highlights the major tendons: the patellar tendon and quadriceps tendon.
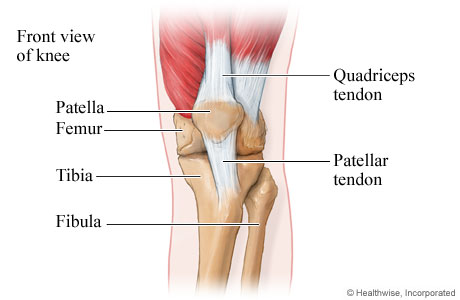
Diagram 2
Inflammation of the patellar tendon is commonly referred to as Patellar Tendonitis or Runner’s Knee and can be cured with the rehabilitation exercises outlined later in this article.
Acute Knee Injury List
Your injury may have been causes by an acute or sudden event:
- Sprains or strains to the tendons or ligaments
- Break or tear in the cushion-like rubbery material of the knee (known as the meniscus)
- Full-on tears to the ligaments—the most commonly hurt are the medial collateral ligament (MCL) and anterior cruciate ligament (ACL)
- Fractures of the kneecap, femur, fibula, or tibia brought on by excessive force such as extreme twisting or heavy impact
- Dislocation of the kneecap itself; this occurs somewhat frequently in girls aged 13 to 18
- Bone shards get stuck in the knee compartment and cause additional issues
- Dislocation of the knee joint—a rare and extreme injury that requires immediate professional medical attention
If you experience any of the more serious injuries, you should consult professional medical help immediately.
Overuse Knee Injuries: Pain Diagnosis
That isn’t the only way problems can occur, however. Furthermore, if you do fall into one of the categories above, it does not necessarily mean that the core cause of pain is truly that single event or activity. Instead, in many cases the forceful event that initiated symptoms was only the final straw that “broke the camel’s back.”
Overuse injuries happen when you perform a movement or activity repetitively. This can provide long-term cumulative stress on the joint. Running is a very common sports-related activity that unfortunately fits this bill.
Lifting weights with improper form while failing to stretch or do mobility movements will also almost always lead to overuse problems.
- Inflammation in the tiny “sacs” of fluid that surround and lubricate the joint (known specifically as bursitis)
- Inflammation of the tendons—referred to as tendonitis or tendenosis depending on the length of time since first experiencing pain (tendenosis is debilitative in nature, meaning it will begin to erode your tendon entirely)
- Folding or thickening of the fibrous material making up the knee ligaments (known as plica syndrome)
- Pain radiating from the front of the knee
- Inflammation and pain in your IT Bands (normally starts on only one side and can spread to both with enough time)
Not included in the two lists above is cartilage. Articular cartilage lines the surface of the bones inside the joint. This special covering helps to absorb shockwaves sent through your legs and hips while giving your body a smooth surface to “glide” on.
If the pain is not related to your muscular system (muscle, tendons) you may have a bone-on-bone issue that deals with this cartilage—this should be brought up and consulted with your doctor.
Positioned between your hips and your ankles, your knees are responsible for helping to “track” your legs in proper alignment with your body and torso as you walk and move around. This is where many of the complications arise.
Because of its location, the knees are pulled and acted on by different muscle groups:
- Quads
- Hamstrings
- Illiotibial Band (ITB or IT Band)
- Glutes
- Abductors
- Adductors
- Many more small muscles and tendons that make up the hip compartment
Taking a closer look at the specific muscles themselves, we see that they are broken down even further. For the quads, different “threads” and fibers of the muscle control different contractions that move the leg and knee in different ways. Diagram 3 displays two notable areas: the Vastus Medialis that is found on the inside of the knee and leg, and the Vastus Lateralis which is found on the side next to the Illiotibial band.

Diagram 3
Diagram 4 gives a peak at these muscles but does not include them all—remember, the body is a complete unit and functions as such. Tight glutes will cause inhibited hamstrings. Inhibited Psoas muscles will cause improper abduction. The list goes on. The only real solution is to restore balance to your entire posterior chain.
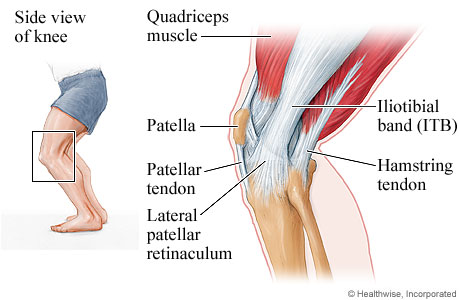
Diagram 4
When the alignment of these muscles is off, many issues begin to develop. While knee pain when bending your leg is an obvious one, some of the other problems can actually contribute to much more serious long-term concerns.
Knowing the proper exercises and protocol for easing your acute or more serious knee pain means the difference between living with pain or without. With that said, it is also worth covering the specific symptoms.
Day-to-Day Knee Pain Symptoms
- Pain when sitting or after you stand up
- Pain when extending your knee
- Pain when flexing your knee (bringing your ankle to your butt)
- Pain that goes away with moderate exercise (such as after the first few sets of squats)
- Pain above, below, inside, or on the outside of the knee joint
- Pain when moving from side-to-side or shuffling
- Pain when jumping
- Pain when playing sports
- Pain with no activity
If you have pain with no movement or activity at all, it is likely that your issues have developed into a more serious case. This does not mean that you cannot fix and relive your pain—it simply means it may take longer. Remember: you didn’t accumulate your injuries and pain overnight—curing them won’t happen overnight either. Luckily though, even the worst cases of debilitating pain can be fixed in weeks to months following the knee pain treatment exercises.
Knee Pain Treatment You Can Do at Home after Injury: Exercise List
Before completing any of these exercises it is important to first perform a warm-up. A 10 minute ride on the stationary bike followed by a set of calf raises and push-ups is an effective strategy if you aren’t already used to exercising regularly.
This provides increased blood flow, enhancing the transportation of oxygen and nutrients to your muscles. Furthermore, an adequate warm-up will cause the release and build-up of synovial fluid—a thick, viscous fluid that fills within the joint cavity to provide cushion and nutrients.
A smart approach begins with the most low-impact exercises first, and then progresses to more difficult weight-bearing activities.
Perform the circuit no more than 5 times per week—start and progress at your own pace (remember, you want to do only as much as you can do without experiencing knee pain).
1. Straight Leg Raises

Straight Leg Raises
Lie on the floor or your bed with your legs stretched out in front of you. Slowly bend one knee until you feel a stretch but no pain. Hold this position for 3-5 seconds. Then straighten your leg and return it to the original position—hold for 5 seconds. Repeat this for 10 “bends” in each leg.
2. Straight Leg Curls
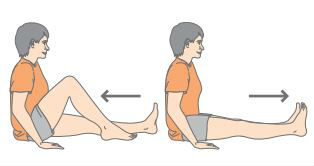
Straight Leg Curls
Sit on the floor or on your bed with your legs fully extended in front of you. Roll up a towel tightly and place it under one knee. Next, push down on the towel with the back of your knee and pull your toes and foot back towards you so that you feel a stretch in your calf muscles as your leg raises off the ground. Hold at the top for 3 to 5 seconds before releasing and relaxing for 5 seconds. Repeat for 10 “raises” on each leg.
Now that we have increased basic motion and range of movement, we can progress to the strengthening exercises.
3. Static Knee Presses
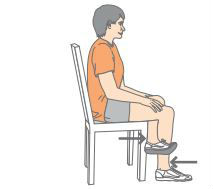
Static Knee Presses
Sit down on a chair and cross one of your legs behind the other. Next, use your back leg to push against the front leg as hard as you can for 5 seconds (while keeping your front leg stationary). Release for 3 to 5 seconds and then repeat a total of 6 times on each leg. Work up to 4 sets of 6 on each leg.
4. Chair Squats

Chair Squats
While sitting on a chair, fold your arms in front of you. While remaining slow and controlled, stand up. Try to increase your repetitions with each session starting at 10. You can do them from a lower chair or the bottom two stairs on a staircase to increase difficulty as well as you progress.
5. Wall Sits
A more advanced version of Chair Squats, the wall sits force you to isometrically contract your leg muscles (contract without moving—planks are another example of an isometric movement).
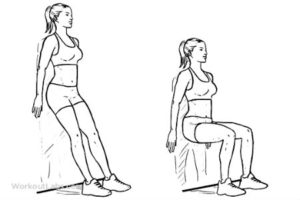
Wall Sits
While standing with your back against the wall and your feet slightly in front of you at shoulder width, in a slow and controlled motion bend your knees. Your goal should be to reach a 90 degree wall sit pain free, but this may take several sessions to accomplish. Don’t ever try to “work through the pain.” That is a recipe for making things worse.
6. Stair Step-Ups
While standing at the bottom of the stairs, step up and down the first step with your left leg. Try to perform as many as you can do pain-free in one minute. Then switch legs and perform as many as possible with your right leg.
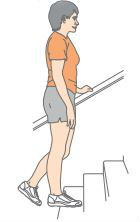
Stair Step-Ups
With each session, attempt to do more repetitions within the 60 second time period. To increase difficulty as you improve, wear a backpack with weights.
7. Calf Raises
While holding on the wall or a chair, raise your heels as high as you can and hold for 3 seconds. Release and return to a fully-rested position; don’t bounce!
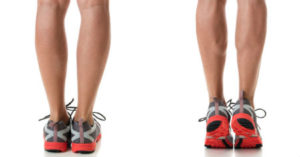
Calf Raises
Complete 15-30 repetitions. With each session attempt to do an additional set. To increase difficulty you can also perform the movement on one leg only, or stand on a stair step to increase the bottom stretch.
8. Supine Short Levers
Lie on one side of your body with your legs bent 90 degrees. Straighten the top leg while keeping your calf parallel with the ground (don’t rotate your leg while raising it). Hold for 5 seconds before releasing and returning to the starting position. Perform 10 repetitions before switching sides. This will be very difficult if you have never done them before—take your time and don’t push yourself if you feel any pain.
After becoming proficient in the low-impact movements and medium-intensity calisthenics, it is time to progress to the most difficult exercises.
9. Machine Leg Extensions
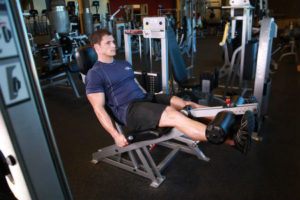
Machine Leg Extensions
Find a leg raise machine at your local gym and perform 3-5 sets of 15-20 repetitions. Keep the weight light and focus on very slow and controlled repetitions. Many suggest that doing a “full rep” on leg raises is unsafe. There is zero scientific literature to support this; perform full repetitions.
10. Machine Leg Curls
Along the same lines as machine leg extensions above, find a leg curl machine and perform 3-5 sets. Except for leg curls, go heavier and do 10 repetitions per set.
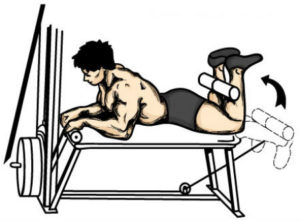
Machine Leg Curls
Most people have much stronger quadriceps than hamstrings and simply strengthening the hamstrings (along with stretching and performing glute mobility—explained below) will resolve a majority of pain in some circumstances.
11. Eccentric Squats
In several case studies published in the National Institutes of Health, eccentric exercises were found to be an effective treatment for tendinopathy or tendonitis-related injuries.
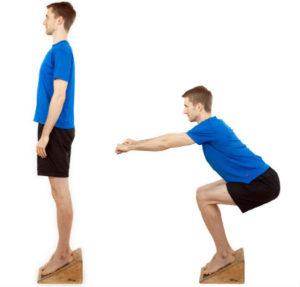
Eccentric Squats
To perform this movement, find an incline. A box placed on an angle works great for this. Using a board and a curb can also work. Next, perform a squat while descending very slow; the eccentric portion of the exercise should be at least 5 seconds. Once you reach the bottom, pause briefly before squatting up in a controlled manner.
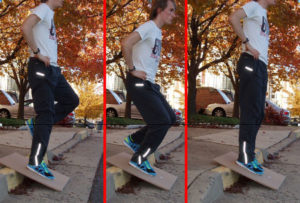
Eccentric Squats done on a curb with the help of a board
Make sure to track your knees in line with your feet at all times—on all exercises.
You can advance to one leg or wear a backpack to increase difficulty as you progress. Begin with 2 sets of 5 repetitions.
12. Leg Presses
If you have access to a leg press machine, you can also take advantage of leg presses. Keep the weight light and focus on tracking your knees directly over your feet as mentioned above.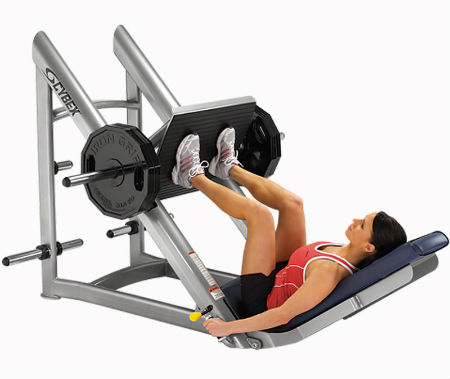
Strengthening the muscles that surround the joint is undoubtedly the most important aspect of fixing your pain. However, without the proper stretching and mobility it will take much longer to completely solve your issue (or perhaps not at all).
Stretches and Mobility Movements for Knee Pain
Before diving into any specific stretches, it is worth stating 100 times that the number one recipe for healthy knees is to simply live an active lifestyle of corrective movement.
What exactly is “corrective movement”?
Simply put, using your body how it was designed to be used from a biomechanical standpoint. That means low-impact activities like walking, swimming, and cycling are great for long-term joint health.
Also worth noting, all activity is not created equal. Mentioned earlier, things like running or high-impact sports can stress the joint to its breaking point.
That’s great if you’re healthy and all, but if you’re in pain you need results—now. It is recommended that you actually do these right before you complete the exercises listed above so that you can first increase your range of motion, and then train that new increased motion with resistance movements.
As a disclaimer, before completing some of the following movements that include myofascial release you will need two pieces of physical therapy equipment (the first 3 are very cheap and you should probably have them anyways):
- Tennis Ball – used in place of a lacrosse ball when you are starting out; much less dense and therefore easier to use on more tender areas
- Lacrosse Ball – standard in physical therapy rehabilitative devices; used to pinpoint target areas to promote myofascial release
- Foam Roller – another standard in rehabilitation protocols; used to roll out different areas of the body to promote myofascial release
- Rumble Roller – an advanced version of the normal foam roller that has spikes on it instead of a flat surface; only recommended once you are pain free for maintaining optimal mobility and range of motion
If you don’t have these items, don’t worry. You can still perform many of the stretches without them while you wait to pick up the items above. As a note, you can often times find them at discount or department stores such as Ross, Marshals, TJ Maxx, Burlington, and others.
Myofascial release is a physical therapy technique that aims to relieve tension and tenderness in the fascia by providing manipulative pressure (with the use of the 4 devices listed above). Fascia is the thin lining of connective tissue, namely collagen, surrounding your muscle tissues that attach underneath your skin and stabilize your muscles.
Some fitness advocates suggest the fascia tissue is able to be literally “broken up” through the use of myofascial release. There is no scientific evidence to support these claims.
Instead, something else is happening. You are providing an excessive outside stimulus to an area of your body so that your nervous system ignores its current state. When you stub your finger, it helps to blow on it or shake your hand. This is the same phenomenon—by providing pressure to the fascia tissue you can essentially remove tenderness limiting your range of motion.
So if you use a lacrosse ball on your glutes, and then immediately perform an eccentric squat, you will be able to increase your range of motion using the physical therapy tool and then work that new range of motion gained with resistance by doing the squat.
The problem with simply doing stretching and mobility by itself is that it is mostly transient. If stretch and fail to do “correct movement” as discussed earlier, you will not take advantage of permanent changes to your movement patterns as easily or effectively.
1. Calf Stretch
Find a wall and flex your foot and ankle so that your toes are pointing up towards the ceiling. Your heal should remain on the floor while you keep your leg straight. Lean in and forward for 5 seconds and relax to the starting position. Repeat for 15 repetitions on each side.
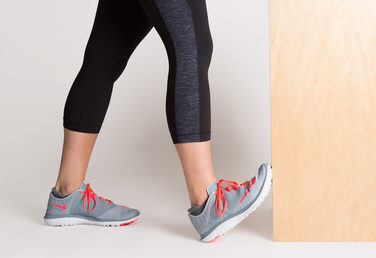
Calf Stretch
2. Lacrosse Ball Calf Smash
While sitting on the ground with both legs extended in front of your body, pull one foot in towards your butt so that your knee bends and flexes. Place a lacrosse ball (or tennis ball if you are starting out) in between your calf and your hamstring, right under your knee. Next, “compress” the ball by pulling your leg back even further. It helps to also move in a circular motion to provide a deep, stimulating massage to the area.
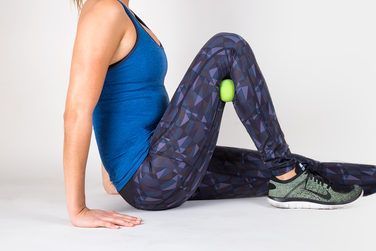
Lacrosse Ball Calf Smash
3. Kneeling Hip Flexor Stretch
While kneeling on a matt or cushion, place your opposing leg in front of you so that your shin is perpendicular with the ground. Then lean forward while keeping your abs flexed (it is very easy to cheat on this if you do it improperly). Hold for 15-30 seconds before relaxing to the starting position. As always, make sure to do both sides.
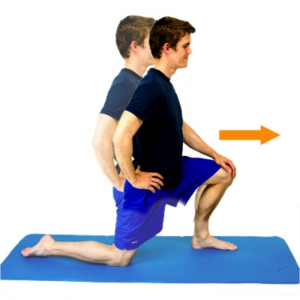
Kneeling Hip Flexor Stretch
4. Foam Roll ITB
Some argue that foam rolling the Illiotibial bands is ineffective or unsafe. This argument, however, relies on the incorrect notion described earlier that the fascia can somehow be physically altered. As described, that isn’t the case—foam rolling your IT bands is not only safe, it is a powerful way for relieving pain in the knees, especially in the case of patellar or quad tendonitis.
While lying down, place the foam roller under leg, just above your knee. As you begin to foam roll up your leg towards your hip, go slowly and rock back and forth between your Vastus Lateralis (outer quad in diagram 3) and IT band.
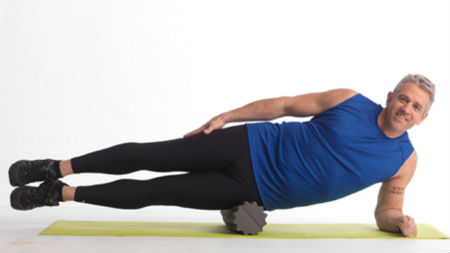
Foam Roll IT Bands
When foam rolling, always roll towards your heart so that blood in forced in the same direction it is moving. Starting with the foam roller at your hips for this specific movement would be the incorrect and unsafe way to do it.
5. Foam Roll and Lacrosse Ball Glutes
Just like your IT bands, you can also use the foam roller to target your glutes. One of the most effective strategies involves first using the foam roller on the entire glute and upper hamstring area. Then, use the lacrosse ball to provide pinpoint pressure to tight and tender areas.
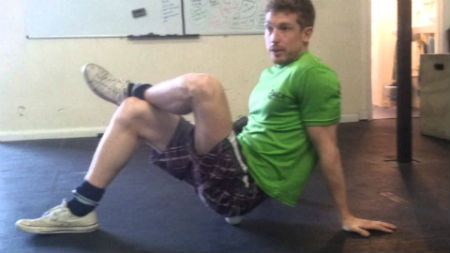
Lacrosse Ball on Glutes (start with foam roller as explained)
To use the lacrosse ball on your glutes, first sit on the ground with your feet slightly bent in front of you. Next cross one leg over the other and place the lacrosse ball under the same side.
6. Frog Stretch
One of the more painful movements is the frog stretch. Its pain, however, is matched in the amount of relief it provides once you are finished. While you are on your forearms and knees, spread your legs apart as far as possible and point your feet outwards. Slowly sit back and perform a deep squat-like stretch. To make the stretch more difficult as you progress, you can set a bench in front of you to push off of and force yourself farther back.
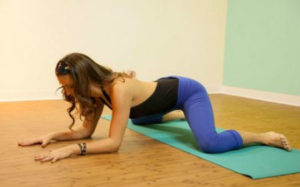
Frog Stretch
7. Foam Roll Adductors
Place the foam roller inside your thigh—right on top of your Vastus Medialis (inner thigh in diagram 3). Foam roll slowly up and towards your inner thigh and groin area. As explained above, do not foam roll back towards your knee. Instead, reposition yourself so that the foam roller is replaced at your inner thigh, and begin rolling up towards your groin again.
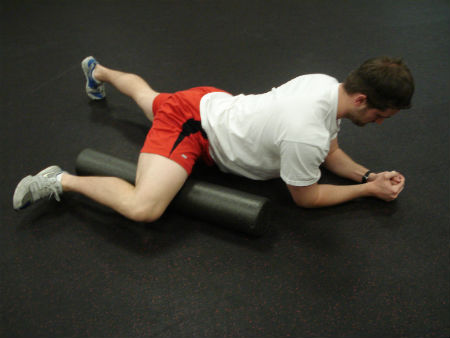
Foam Roll Adductors
8. Psoas Bench Stretch
Also a painful stretch (but oh so powerful) is one that targets the Psoas muscle. The Psoas major muscle is attached to the vertebral column and travels down through the lesser pelvis before attaching to the top of the inner femurs. It becomes extremely tight and inhibited with sitting. If you have a sedentary job (even if you exercise regularly) or lifestyle that causes you to sit for multiple hours every day this is likely the case.
While facing a bench about knee height or higher (the higher, the harder and deeper the stretch), place your leg on the bench so that it is parallel with the ground and perpendicular with your torso. As you lean forward, make sure your heal remains on the ground. The video below displays exactly how to do it if you are confused.
9. Spiderman Stretch
With your hands and feet on the ground, bring one knee up towards your chest but outside of your arm. Lean forward while flexing your abs to experience a deep stretch. Hold for 5 seconds before returning to the starting position to repeat on the other side. Perform 5-10 repetitions total for each leg.
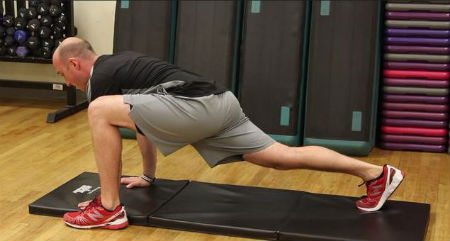
Spiderman Stretch
To make the movement more difficult, rotate towards your flexed side.
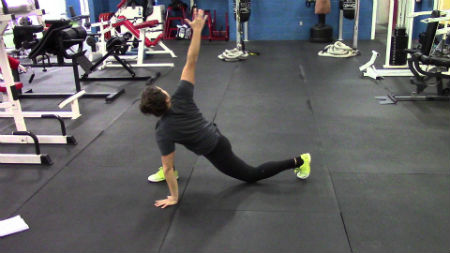
Spiderman Stretch with Rotation
10. Warrior Stretch
While standing upright with both feet shoulder width apart, take a step forward with one leg while positioning your back foot so that it is perpendicular. Lean forward into a full lunge while keeping your core tensed. Hold for 15-30 seconds before performing on the other side.
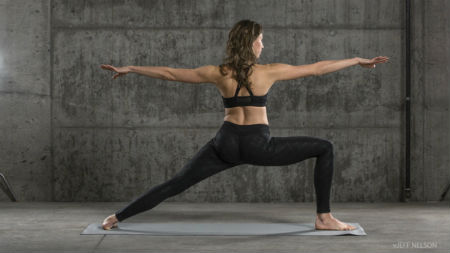
Warrior Stretch with arms stretched out
11. Hip Circles
While on your hands and knees, bring one knee off of the ground while keeping the other stationary. Begin to extend and abduct your hips before flexing and adducting them to create a circular motion. Do this both ways (if you are confused, this video demonstrates).
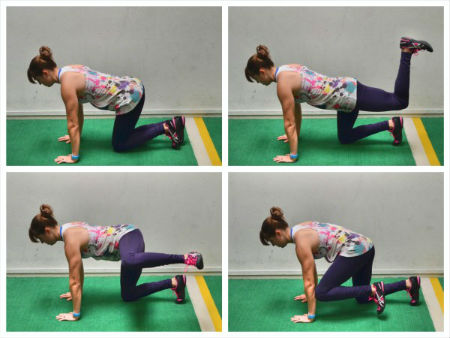
Hip Circles
This is a great list to get you started. If you are exceptionally tight and inhibited, read and follow our mobility guide.
If you are confused about the movements above, feel free to watch the video below.
https://www.youtube.com/watch?v=okOQWfGq3bU
How to Relieve Knee Pain: The Full Treatment Plan
While the most optimistic approach would include every single stretch every single day and all exercises five times each week, time is limited and sometimes it just isn’t pragmatic or even possible to spend 2 to 3 hours every day stretching and strengthening. For some such as athletes, this will be perfectly fine and even preferred for an immediate return to competitive play.
Your first few times through, you should complete every exercise and stretch—no questions asked. If you are serious about fixing your pain, you need to complete the necessary steps to heal and correct your body’s muscular asymmetries (uneven muscles) and inhibited areas.
But after you have completed it several times through, you will be able to determine which areas provide the most cause for concern. Moving forward, focus on these first with the Pareto principle in mind (the 80/20 rule).
Staying consistent and following the rehab protocol to the best of your ability will be the deciding factor in whether you heal fully and go on to live a pain free life. As you graduate on and fix your knee issues, be sure to return to these same movements every so often to make sure you stay problem-free for years to come.

